Tutorials

Monday, 30 September 2024

Merry Christmas

Hello bloggers!  I started today's card by cutting the  Snowflake Floating die out of white card.  I used spray glue on it (due to the detail, it was easier than trying to cut it with a sticky adhesive sheet attached) and coated it with Frosted Sparkle Glitterbitz.  I added small pieces of mounting foam to the back of it.  I attached it to a piece of card that I marbled using shaving foam and assorted alcohol inks (there is a tutorial on it at the top of the blog).  I had some of it leftover so I cut the oval out of it using the Double Stitched Oval die set.  I added mounting foam to the back of the frame and attached it to a piece of white card.  I added it to the centre of the  Snowflake Floating background.  I cut the Noble Merry Christmas out of silver sparkle card and glued it to the inside of the frame.  The card was completed with white mats and layers.  The finished dimensions are 7 1/4"  x  8 1/2" in size.  


All for now, Sue x


                                                          Follow my blog with Bloglovin

Sunday, 29 September 2024

Wishing You Peace, Love & Joy

Good Sunday morning all!  I embossed a piece of white card with the Falling Snow embossing folder for the background.  Next I cut the outer die from the Harvest Stained Glass die set in black.  I cut the Christmas Angel 2024 out of milk card and Antique gold card.  I used the milk die cut as the base and coloured her skin and hair with pencils.  I added the dress cut from the gold die cut to it.  I cut the wings out of several pieces of white vellum and glued them behind her.  I added her halo cut from gold mirror card and the banner out of white and black card. I cut the star out of gold card and added it above her head.   I cut two poinsettias from the Stylish Poinsettia set out of gold glittered card, assembled them and added them to the bottom side of the oval.  The Wishing You Peace, Love & Joy sentiment was cut out of antique gold card and added to a white shadow backing piece.  I added it with mounting foam to the bottom of the card.  The card was completed with white mats and layers.  The finished dimensions are 7 1/4"  x  8 1/4"  in size.  


All for now, Sue x


                                                          Follow my blog with Bloglovin

Saturday, 28 September 2024

To Wish You A Merry Christmas

 Hi there my crafty friends!  I selected a pixied piece from my stash to use for the background.  I used Midnight Blue and Purple Violet Pixie Powders on it.  I cut the Moonlight Sleigh Cover Plate in black.   I cut the die a second time in white and used the fall away pieces to paper piece the moon.  I added the Cover Plate die piece to a larger piece of white card.  I cut the To Wish You A Merry Christmas sentiment in black and added it to the shadow backing piece which I cut in white.  I added the sentiment below the cover plate with mounting foam.  I used the fall away stars from the cover plate which I cut a couple of times with the leftover piece from the pixied background around the sentiment as accents.  The card was completed with white and black mats and layers.  The finished dimensions are 7 1/2"  x  8"  in size.  


Just wanted to let everyone know that the hurricane has passed through our area and we didn't have any damage from it.  I do not yet know what the areas surrounding us look like however.  I know from the local news that about 600,000 homes are without power in this county alone.  It definitely wasn't without damage to some of the surrounding areas north of us so it will be an uphill battle for many unfortunately.  My heart goes out to those who have suffered great damage from this storm.  Hopefully they will be able to rebuild and get up and running again soon.

All for now, Sue x


                                                        Follow my blog with Bloglovin

Friday, 27 September 2024

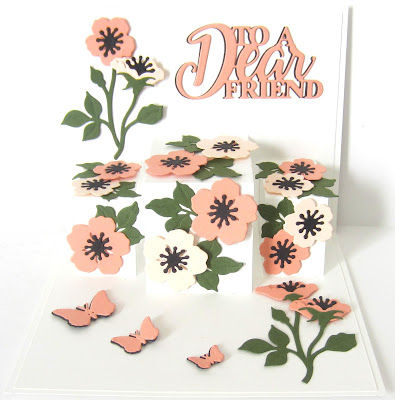
To A Dear Friend

Hello bloggers!  I have another pop up card to share with you today.  I started by cutting the Wild Rose Cover Plate with a piece of black card on top of a piece of white card.  I cut the die again out of peach and green card and paper pieced the fall away pieces back into the black die cut after gluing it to the white die embossed copy.  I used some white pencil to add some highlights. I matted it with peach and white mats.  I cut the 3D Card maker die in white and glued it inside to the folded white mat.  Using the Wild Roses die set, I cut the roses in shades of peach, added the stems and leaves to them then added them to the pop up parts of the card and the top and lower pieces.  I cut the To A Dear Friend sentiment in peach and black.  I shadowed it and glued it to the top corner of the card.  I added another full flower to the bottom of the card and cut three small butterflies from the Bountiful Butterflies die set in peach with a black shadow.  I glued them to the bottom of the card.  The finished dimensions (closed) are 4 3/4"  x 6" in size.  


All for now, Sue x


                                                                       Follow my blog with Bloglovin

Thursday, 26 September 2024

Wishing You Peace, Love & Joy

Hello crafters!  I started with a piece of powder pink card and embossed it with the Nordic Tiles embossing folder.  Using the Candy Canes die, I cut them out of raspberry card and backed them in white.  I crisscrossed them and added them to the middle of the card.  I cut the greenery from the set and added sprigs to both sides of the candy canes.  I cut the bow out of white gloss card and attached it across the middle of them.  I cut two holly leaves and added them to the top two corners with raspberry coloured berries.  I cut the Wishing You Peace, Love & Joy sentiment in raspberry card and glued it to a white shadow backing piece.  The card was completed with whit and raspberry mats and layers.  The finished dimensions are 6 3/4"  x 8"  in size.  


Just a quick note to let everyone know that we are in the path of a major hurricane that is set to hit land tonight sometime.  While we are prepared for it and are not too near the Gulf of Mexico, I do not anticipate any major issues for us here as we have a generator, however, the internet will probably be out for some period of time.  They are saying to expect no electricity or internet for at least a week (but could be as long as a month depending on the storm damage) so I have scheduled up as many posts as I can, but if it lasts longer, I may not be able to keep the blog up and running until we get the internet back.  I have put pics on Facebook that will post each day until Oct. 6th though)   Please just keep checking if that is the case, I will be back as soon as I am able.  I have not missed a day's post in over ten years, so fingers crossed it won't happen now!

All for now, Sue x


                                                 Follow my blog with Bloglovin

Wednesday, 25 September 2024

Beware

Hello bloggers!  I started this card by covering a piece of black card with a sticky adhesive sheet.  I peeled the backing paper off and coated it with Pink Sunset Gilding Flakes.  I used a piece of Rubit Scrubit pad to move the flakes around on the card, then refine and remove the excess flakes.  I cut two circles, about 2 inches in diameter in both black and white card.  I used the white circle as a shadow behind the black one and glued it to the upper corner of the card.  Next I cut the Boo To You Frame twice out of black card.  I nipped away one side of both of them, then rejoined them to make a larger frame.  I glued it over the corner of the moon.  I cut the Grim Reaper out of black gloss card and added him inside the frame.  I cut two headstones in black to go next to him.  I cut the Beware sentiment in both black and white card.  I shadowed the black die cut with the white one slightly offset behind it and glued it to the upper corner.  The card was completed with white and black mats and layers.  The finished dimensions are 6 1/4"  x  7 1/2"in size.  

https://www.creative-expressions.uk.com/product/creative-expressions-sue-wilson-halloween-grim-reaper-craft-die/

All for now, Sue x                                                                                              


                                                    Follow my blog with Bloglovin

Tuesday, 24 September 2024

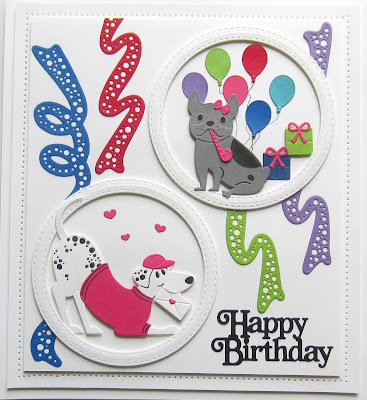
Happy Birthday

 Hello bloggers!  I tarted today's card by cutting two circular frames using the Double Stitched Circles.  I added mounting foam t the back and added the frames in opposite corners.  I cut the Dotty Streamers in blue, red, green and purple and glued them around the circles.  In the top frame I added Coco the French Bulldog cut out of slate grey card.  I added an assortment of balloons and pressies around him.  In the lower frame, I cut Dottie in white and added the black spots with a fine tipped felt pen.  I cut the sweater and cap in raspberry and added some pink hearts around him.  I added the Happy Birthday sentiment in black in the lower corner.  The card was completed with white mats and layers.     The finished dimensions are 8 1/4"  x  9"  in size.


 All for now, Sue x


                                                         Follow my blog with Bloglovin

Monday, 23 September 2024

Merry Christmas

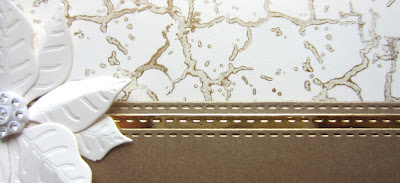
Hello bloggers!  I selected a piece of milk card for the background.  I used the vein stamp from the Sending Sunshine stamp set and inked it by adding some gold mixative onto my craft mat and picking it up with the stamp.   I stamped it all the way around the edges of the card.  Next I cut two of the Double Stitched Rectangles out of antique gold card.  I used the Double Stitched Rectangles Set B to cut the gold mirror card die that fits in between the other two mats.  I used the Stylish Poinsettia set to create three flowers out of milk card.  I had a damaged embellishment so I nipped off the remaining spokes from three of them and used them as accents in the middle of the flowers .  I seated the flowers in opposite corners.  I cut the Merry Christmas die out of gold mirror card and milk card.  I used the mirror card die cut as an offset shadow behind the milk die cut and glued it to the centre of the card.  The card was completed with milk mats and layers.  The finished dimensions are 8"  x  9"  in size.  


 The winner of the September die release is .................................................................................................................................................................................................................................................................................................................................................................................................................Sued99!!!


Congratulations!  Please email me at americansue1@gmail.com to confirm your postal address and claim your prize.  All for now, Sue x 


                                                           Follow my blog with Bloglovin