All for now, Sue x
A daily papercrafting blog which features my handmade cards showcasing Creative Expression's products including my own line of cutting dies and embossing folders, Cosmic Shimmer, Ranger and more which use various techniques and ideas to hopefully inspire the creativity in you.
Tutorials
▼
Sunday, 30 June 2024
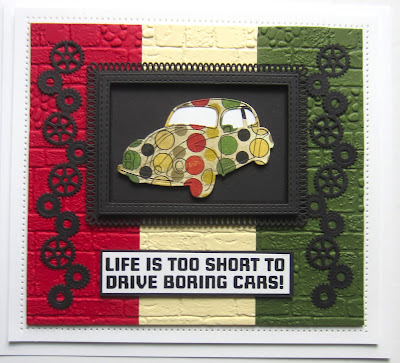
Life Is Too Short To Drive Boring Cars
Good Sunday morning all! I selected a printed paper from my craft stash, then found three colours of card to match it. I cut a wide strip of each of the three colours of card and taped them together from the back. I embossed them using the Brick Wall embossing folder. Next I cut a mat from the Looped Rectangles in black. Using the Double Stitched Rectangles, I cut a matching black frame and added it to the Looped Rectangle mat with mounting foam. I cut the Volkswagon from the Classic Cars die set out of the spotted paper. I added a piece of white card for the windows and used a fine tipped black felt pen to add in the details of the car. I added it to the inside of the frame with mounting foam. I stamped the sentiment from the Classic Car stamp set in black and matted it with a thin black mat. I added it beneath the frame with mounting foam. I cut two of the cog border from the Assorted Tool Border die set in black and glued them to the sides of the card. The card was completed with white mats and layers. The finished dimensions are 7 3/4" x 8 1/4" in size.
Saturday, 29 June 2024
Birthday Wishes
Hello crafters! I selected a piece of pixied card from my background stash pile. It was created using Aqua Lagoon and Teal Wash Pixie Powders. I cut the Dazzling Diamond die twice out of white card. I cut both of them in half down the centre and glued the cut edges to the four sides of the pixied background. I cut two of the centres of the Dazzling Diamond dies from the leftover pixied card and cut them in half and glued them to the white die cuts. Using the Round Corner Squares, I cut a white frame and added mounting foam to the back of it. I attached it to a piece of white card and added it to the middle of the card in a diamond orientation. I cut the Art Deco Birthday Wishes die in black and glued it inside the frame. I added three small pearls above and below it as accents. The card was completed with white mats and layers. The finished dimensions are 7 1/2" x 7 1/2" in size.

All for now, Sue x

Friday, 28 June 2024
Sending A Happy Hello
Hello crafters! I started today's card by cutting Wild Daisy Cover Plate with a piece of black card on top of a piece of white card. I used the bottom piece of white card to colour the image since the design was embossed into it. I used alcohol ink markers to colour it. I matted it with a piece of white card then a piece of soft lavender card. I added it to a larger piece of white card, leaving room for the sentiment at the bottom. I cut the Sending A Happy Hello sentiment in black , then added it to a white shadow backing piece. I added the sentiment with mounting foam to the bottom of the card. Using the Bountiful Butterflies, I cut with a piece of black card on top of a piece of white card. I coloured the white copy, then added the black die cut on top. I seated the butterfly in the middle of the Daisy Cover plate die. The card was completed with white and black mats and layers. The finished dimensions are ???? in size.

The winner of the June die release blog launch is ..........................................................................................................................................................................................................................................................................................................................................................................................................TOOTH FAIRY JO!!!
Congratulations! Please email me at americansue1@gmail.com to confirm your postal address and claim your prize. All for now, Sue x

Thursday, 27 June 2024
Season's Greetings
Hello bloggers! Starting with a piece of white card, I taped the Polka Dot stencil to it and used Apple Red Sparkle Texture Paste through the mask with a palette knife. I set it aside to dry thoroughly. I cut a thin white frame using the Double Stitched Circles. I added mounting foam to the back of it and attached a piece of white card to it. I used the Fabulous Foliage set and cut a variety of frond in green and added them to the lower portion of the frame. Using the Wild Birds die set, I cut two birds out of tan card. I used Festive Berries Distress ink to add red bellies to both of them. I cut the nest and twig branch out of tan card and used Gathered Twigs Distress ink to the edges of the nest, twig and two birds. I arranged the branch across the frame and seated the bird on it and the other one on the edge of the frame. I cut the Season's Greetings sentiment in black and glued it inside the frame. The card was completed with white mats and layers. The finished dimensions are 7" x 7" in size.

All for now, Sue x

Wednesday, 26 June 2024
Nice Wheels
Hi crafters! I started today's card by cutting a piece of white card and using the Nice Wheels stamp from the Super Cars stamp set and randomly stamping it all over the card. I used a black archival ink pad to stamp onto the background. I used the Double Stitched Rectangles and I cut two backing mats, one in red and one in white. I layered them up and added them to the centre of the background. I cut the cog border in black four times from the Assorted Tool Borders. I added them around the edge of the white mat. I inked the Porsche stamp with a black ink pad and stamped it onto red card. I used the matching Super Car die to cut it out. I added it to the middle of the card with mounting foam. The card was completed with white mats and layers. The finished dimensions are 7 1/4" x 8 3/4" in size.
All for now, Sue x
Tuesday, 25 June 2024
Have A Roaring Good Time
Hello bloggers! I cut the Art Deco Skyline Background out of both silver and black card. I shadowed the silver die cut with the black die cut, then added a white backing to it. Using the Double Stitched Rectangles, I cut a white frame. I glued a piece of acetate to the back of it then added it over the background with mounting foam. Next I cut the Elegant Stroll first out of milk card and I used it for the base. I cut it again out of cobalt blue card and nipped away the dress, hat, gloves and shows and glued them onto the base die cut. I used coloured pencils to colour her hair and skin. I cut the dog out of gray card and glued it on to the base piece. I added her with mounting foam to the corner of the frame. I cut the Have A Roaring Good Time out of both cobalt blue and black card. I shadowed the sentiment with the black die cut then glued it to the top of the background. The card was completed with white mats and layers. The finished dimensions are 7" x 8 1/4" in size.


Monday, 24 June 2024
Merry Christmas
Hello bloggers! I started today's card by cutting a Double Stitched Square out of white card. While it was still in the die, I sponged Tumbled Glass Distress Ink around the edges. I cut a larger piece of Brushed Silver card and matted it on top. I cut the Crystal Kaleidoscope die out of Silver Sparkle card. I layered it on top of a backing piece cut out of white card. I cut the inner die from the set out of white card and matted it on to a circle cut of silver sparkle card. I taped the centre to the outer piece then added it to the inked backing piece. I cut a larger piece of white card and added the entire piece to the top portion of it. I cut the Merry Christmas sentiment out of silver sparkle card and glued it to the bottom of the white card. The card was completed with white mats and layers. The finished dimensions are 6 3/4" x 9" in size.
Sunday, 23 June 2024
Just Because
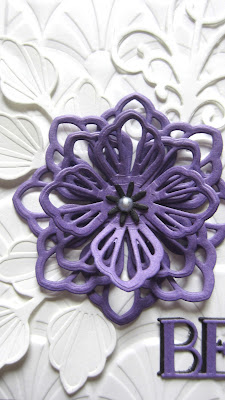
Good Sunday morning all! I started this clean and simple card by embossing a piece of white card with the Art Deco Arches embossing folder. I cut the Art Deco Floral Extravaganza die out of Amethyst card and made a single flower by offsetting two sizes of the flower. I seated it in the corner and added white leaves around it. I used the Splendid Swirls to add an accent. I cut the Art Deco Just Because sentiment out of black and amethyst card. I shadowed the amethyst die with the black die cut and glued it into the lower right corner. The card was completed with white mats and layers. The finished dimensions are 6" x 7 3/4" in size. All for now, Sue x


