Tutorials

Thursday, 30 September 2021

Noel

 Hello bloggers!  I had a little rummage around in some of my decorative papers for this card.  I selected a couple of patterned papers, however, I cannot recall what company makes them, they are quite old (I think they are Graphic 45).  I selected a green dotty paper for the base and I used the reverse side with the holly pattern on it for the top.  I cut a slit in the paper and rolled it away from the cut opening and glued it in place.  I stamped and cut the Poinsettia Stampcut, then coloured it with Distress Markers.  I layered it up with one of the smaller flowers in the set and then added some clear micro beads to the centre.  I cut two of the Holly Sprays in green and seated them with the flower to the left centre of the rolled paper.  I cut the Noel Bold word out of antique gold and shadowed it with a gold mirror card die cut.  The card was completed with white and red mats and layers.  The finished dimensions are 7"  x  8 1/2" in size.  All for now, Sue x


                                                        Follow my blog with Bloglovin

Wednesday, 29 September 2021

Have A Merry Christmas

 Hello crafters!  I started this card by cutting the Merry Big Bold Word die in white.  I added it to a black backing piece.  I cut the die again, but out of Ruby Red card this time.  I used the fall away pieces from the die cut and paper pieced them back into the Merry die.  I embossed a piece of white card with the Stripes embossing folder and added the Merry word to it.  I used the Double Stitched Rectangles and made a white frame and added it with mounting foam.  I used the penguin from the Penguin Palace die set and added it at the bottom corner of the frame along with the North Pole sign.  I stamped the rest of the sentiment and cut them out with the tag die from the set.  I attached them with foam.  The card was completed with white, red and black mats and layers.  The finished dimensions are 7"  x  8 1/4"   in size.  

We still have unclaimed dies from the blog launch drawings.  Scroll down to see if your name is on the list.  All for now, Sue x


                                                       Follow my blog with Bloglovin

Tuesday, 28 September 2021

September Blog Launch Die Winners

 Hello there my crafty friends!  Another month's launch done and now we have some more winners!  Yeah, this is the best part, huh??  Without further ado, here are the names of the winners from the launch:


You Are So Special:   cr@fty Heather T!!!

Out Of This World:  kirstie black (engineer girl)!!!

Hello Sweet Friend:  Snuffy Snoo!!!

If Friends Were Flowers:  kittydavies47!!!

Just A Note Duo:  Maria MK!!!

Belated Birthday Duo:  Crewe Trish!!!

Happy Anniversary Duo:  Blue Fairy 4U!!!

No Place like Home Duo: Crafty Vonnie!!!

Were In This Together Duo: Ann Topp!!!

New Beginnings Duo: Beryl!!!

Scalloped End Rectangles:  Princess Pixie!!!

French Marigold:  Rose in Chester!!!


Congratulations all!  Please email me at americansue1@gmail.com to confirm your postal address and claim your winning die.  I ask that you put the name of the die you won in the subject line of your email, this helps us get the right die to the right person, thank you.  All for now, Sue x


Just Because

Hello crafters!  Using a piece of pixie powdered card from my stash, I cut the leafy panel from the Flowering Dogwood Floral Panel die set.  I cut it into the card three times close together.  I covered a piece of white card with a sticky adhesive sheet, then added it as a backdrop behind the die cut.  I coated it with Frosted Sparkle Glitterbitz for a bit of bling.  Using the Cosmos Flower outline die, I made a large flower out of white card.  I seated it in the lower left corner and added leaves from the Pinwheel Floral as accents.  I cut the Just Because in white and black and shadowed it then glued it in the upper corner.  The card was completed with white mats and layers.  The finished dimensions are 7"  x  7 1/2"  in size.   

I will be doing the drawings for the Sept. Blog Launch winners and posting it here later on this afternoon so please don't forget to check back then!  All for now, Sue x


                                                            Follow my blog with Bloglovin

Monday, 27 September 2021

You Are So Special

Hello crafters!  I just love these slimline All In Ones and thought I would share another one with you!  I started with a piece of Pixie Sparkled card from my stash.  I used Pumpkin Patch, Corral Crush and Boulevard Lights all over a piece of card, then spritzed it with water and let it dry.  Next I cut the You Are So Special die several times.  Once out of black card, once out of antique gold card and once out of the pixie sparkled card.  I used the black one as a base, then I added the leaves on to it by nipping them out of the gold die cut.  I used the frame from the pixied card and cut the three flowers out of it.  I glued them in place on to the black die cut.  I cut a wide frame using the Slimline Stitched Rectangle Frames die.  I cut it out of white card that was covered with a sticky adhesive sheet.  I used Frosted Sparkle Glitterbitz on the frame.  I added it with mounting foam around the die cut.  I added a white backing to the entire die cut.  The card was completed with white and black mats and layers.  The finished dimensions are 5 1/4"  x  9 3/4"   in size.  All for now, Sue x


                                                        Follow my blog with Bloglovin

Sunday, 26 September 2021

Just Because

Good Sunday morning all!   It has been a long time since I made a black and white card!  I started with a piece of white card and covered it with a piece of sticky adhesive sheet.  I peeled the backing off and coated it with Diamond Frost.  Next I ran it through the Sublime Swirls embossing folder.  I cut the Because Big Bold Word die in black and added it to the backing piece which I cut in white.  I used the stamps that are part of the die set and stamped the word "Just" and cut it out with the tag from the die set.  I added it with foam to the top of the card.  The card was competed with white and black mats and layers.  The finished dimensions are 6 1/2"  x  7 1/2" in size.  All for now. Sue x


                                                              Follow my blog with Bloglovin

Saturday, 25 September 2021

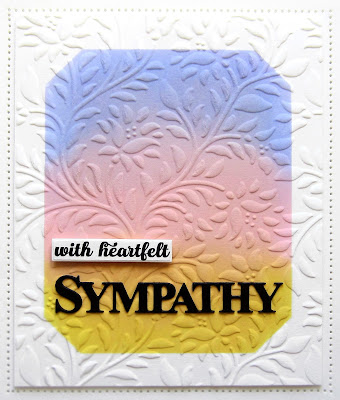
With Heartfelt Sympathy

Hello bloggers!  I started by cutting a mask using the Clipped Corner Rectangles.  I taped the leftover card after cutting the die to a piece of coconut white card.  I used Distress Inks (Shaded Lilac, Worn Lipstick and Fossilized Amber) and inked it across the opening in sections.  I removed the stencil and then embossed it with the Fanciful Flowers embossing folder.  Next I cut the Sympathy word die out of black card.  I glued it to the bottom portion of the card, then stamped the rest of the sentiment using the stamps from the set.  I cut it out and added it above the word with mounting foam.  The card was completed with white mats and layers.  The finished dimensions are 7"  x  8 1/2"  in size.  All for now, Sue x


                                                          Follow my blog with Bloglovin

Friday, 24 September 2021

Festive Accessories

Hello there my crafty friends!  We are back to one post a day for a few more weeks now!  I began by cutting the Slimline Decorative Holly Rectangles frames in gold, red, white and green.  Once cut, I cut the pieces in half and stacked them so the edges were aligned on each side.  I cut a white one to use as the base in the centre of the card.  I used the cut away pieces from the Inner Scalloped Apertures as mats for the middle then added the Festive Accessories on top.  I used some Fluffy Stuff on the stocking.  I cut the tree out of Glitter Kiss card then decorated it with the small ornaments and garland from the set.  The card was completed with white and gold mats and layers.  The finished dimensions are 6 1/4"  x  8 1/4"   in size.  All for now, Sue x


                                                        Follow my blog with Bloglovin

Thursday, 23 September 2021

French Marigold

 Hello bloggers!  Welcome to the final blog post of the Sept. launch.   Last but not least is the French Marigold die set.  This set has six dies in total.  There are three different sized flowers and three different sized leaves that are included.  You may have noticed these flowers on some of the earlier posts.  This sample shows the dies done up in a different look as previous samples so you can see the versatility that they offer.  I will ask you again to eave your comment on this post and don't forget to leave your name on the comment too.  I will be doing the drawings and posting the winners on Sept. 28th so don't forget to check back to see if your name is among the list of winners!  I hope you have enjoyed the launch, even though it was a rather quick one!  All for now, Sue x


                                                         Follow my blog with Bloglovin

Scalloped End Rectangles

Hello there my crafty friends!  This is one of my favourite dies from the launch.  Introducing the Scalloped End Rectangles Noble die set.  There are six dies in this set all with a pretty square edge detail in them so you can make any number of frames or matting and layering.  I think you are really going to want to get your name entered into this die drawing!  Please don't forget to make your name memorable in some way so you know it was your name drawn out.  There is one final post coming your way at 6pm today.  All for now, Sue x


                                                        Follow my blog with Bloglovin