Tutorials

Saturday, 30 June 2018

Floral Framed Love Card


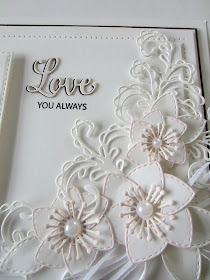
Hi bloggers!  How about this for a simple, elegant card for your special someone!  The Love mini expression works so well with the matching Big Ideas stamp set too.

Just a quick reminder to let you know that I will be doing the One Day Special on Hochanda today starting at 6 pm tonight and another show at 8pm! 

Don't forget to scroll down to see the winners from the Christmas die launch.  There are still quite a few that need to be claimed!


 The finished dimensions are 6 1/2" x  8 1/2" in size.  All for now, Sue x
                                                       Follow my blog with Bloglovin

Friday, 29 June 2018

Winners of the 2018 Christmas Die Release

Hi bloggers!  Thank you so much for an amazing Christmas 2018 die launch.  I was really pleased that the release was so well received.  I am looking forward to seeing so many of the dies being used all year round too!  Without further ado, here is the list of die winners:


Christmas Angel 2018:  Arlyn (O)!!!
Starburst:   Joan McKevitt!!!
Triptych Window:  Judy Hollers!!!
Mosaic Bauble:  Hetty Garlick!!!
Swirled Silent Night:  rj's music!!!
Lattice Poinsettia Background:  Stella Munn!!!
Christmas Bell:  Maria Alder!!!
Jingle Bells Mini Expression:  Crewe Trish!!!
Frosty Snowflake Border:  Karen Drew!!!
Frosty Snowflake Corner:  Mavis L!!!
Snowfall Background:  Izzy Wheadon!!!
Star Wreath:  Sarah Wrightson!!!
Netted Star Background:  Sharon Casey (Hunny Mummy 54 from MK)!!!
Christmas Robin:  Eileen Elder!!!
Twas The Night Frame:  Croquet Queen!!!
Believe In The Magic Frame:  Suemac!!!
Build A Snowman:   Lynne L in Havordfordwest!!!
Snowball Frame:  Margaret Rogers!!!
Holly Jolly Christmas:  Gwen 70!!!
Let It Snow Mini Expression:  Netty the Runner!!!
Angelina:  Nana on the Hill (Gail R) !!!
Carol:  Diane Broad (Di Di from Broadstairs Kent)!!!
Natalie:  Jenny Briggs!!!
Season's Greetings:  Carol Edwards!!!
Merry Christmas Mini Expression:  Sunset Bay!!!
Happy Christmas Mini Expression:  Geordie Jan !!!
Faith:  Muriel Kelly!!!
Eve:  Theresa w in Berks!!!
Mary:  Hazel Young!!!
Overlay And Ornament:  Crafty Vonnie!!!
From Our House To Yours Mini Exp:  Dawn Holben!!!
Tis The Season Mini Expression:  Yvonne 119856!!!
Warmest Wishes Mini Expression:  Tooth Fairy Jo!!!
Ho Ho Ho Mini Expression:  Lilly's Craft Corner!!!
From Me To You Mini Exp.:  Kirstie Black (engineergirl)!!!
Christmas Floral Stem:  Maggie B from Pyford!!!
Bold Holly Leaves:  Sharon in Toronto!!!
Poinsettia Garland:  Jean Z!!!

Congratulations all!  Please email me at americansue1@gmail.com to confirm your address and claim your winning die set.  Please put the name of the set you have won in the subject line of your email, it really helps us to get the right set to the winner.  All for now, Sue x

Miss You

Hello there my crafty friends!  I started this one with the background.  Rather than just stamping onto the background, I wanted it to be a bit more dimensional so I stamped the Shaded Passion Flower in black on white card and cut them all out.  I did them in a couple of different sizes, then added them on to another piece of white card covered with a piece of sticky adhesive sheet.  I filled in the remaining sticky areas on the background with Frosted Sparkle Glitterbitz.  Next I used the Double Pierced Noble Circles and cut a frame in black.  I added mounting foam to it and centred it in the middle of the background.  I cut the Flora die in raspberry card and seated it inside the black circular frame.  I cut two smaller circles for the centre and used the Miss You mini expression cut in pink in the middle of it.  I used a black shadow on it before gluing into place.  I made a dimensional flower as an accent using the same stamped flower image.  I inked the edges with Picked Raspberry.  I seated it on a white satin bow with leaves.  White, pink and black mats and layers were used to complete the card.   The finished dimensions are 7" x  8" in size.

I will be back later today with the winners of the die launch drawings, don't forget to check back!   All for now, Sue x


                                                     Follow my blog with Bloglovin

Thursday, 28 June 2018

Formal Attire Card


Hi bloggers!  I just love how the Pressed Shirt die set can be used for so many looks and occasions!  See how easy it is to turn it into a formal card for a wedding or anniversary card in today's video offering.


 The finished dimensions are 6 1/4" x  9" in size.  All for now, Sue x
                                                       Follow my blog with Bloglovin

Wednesday, 27 June 2018

Wishing You Brighter Days

Hello all!  This is one of my favourite cards, so I hope you like it as much as I do!  I started with the Garden Circle Scene die set and cut a blue circle backdrop.  I used most of the accessory dies from the set to add grass, flowers, clouds and birds.  I used the Wishing Mini Expression for the first part of my sentiment and cut it in brown and added it to the centre of the circle.  Next I used the branch from the A Little Birdie Told me set.  I cut it in tan and added green to the leaves using Peeled Paint Distress Oxide ink.  I used it upright instead of as a branch.  I taped the circle to a larger piece of coconut white card.  On the lower section, I added the remaining part of my sentiment taken from a stamp where I masked off the "wishing" word and stamped it in black on white card.  I used the Stitched Flags die set to cut it out with and added it to a slightly larger sky blue mat .  I used the Double Stitched Rectangles and made a multi layered frame that surrounded the two pieces.  I completed the card with white and Sky Blue mats and layers.  The finished dimensions are 7" x  8 1/4" in size.  All for now, Sue x


                                                      Follow my blog with Bloglovin

Tuesday, 26 June 2018

Treat Yourself Cupcake Card


Hi crafters!  I have a sweet (pun included!) card for you today, very simple but elegant.  This would be a great card to send to just about any of your friends, don't you think!


The finished dimensions are 7" x  8" in size.  All for you, Sue x
                                                     Follow my blog with Bloglovin

Monday, 25 June 2018

Hello

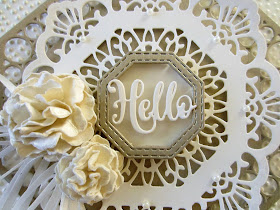
Hello bloggers!  I wanted to show off the new Pinpoint embossing folder, Graded Diamonds, with this card.  I embossed a piece of milk card using it for my background.  Next I went over the top of it very lightly with Enchanted Gold Gilding Polish to just highlight the pinpoint feature to it.  Next I used the Classic Adorned Octagon section cut in Antique Gold as a backdrop for my focal element.  Next I cut the Sophia die in milk card with both sections and layered it up.  I cut a small Octagonal frame using the Double Stitched Octagon set and added a piece of acetate to the back of it before adding a thin edge of mounting foam.  I seated it in the middle of the layers and cut the Hello mini expression a few times out of milk card.  I stacked them then glued it into the centre of the acetate.  I used the Passion Flower die to make two milk card scrunched flowers as accents.  I seated them on a cream satin ribbon bow on the side of the focal element.  Gold and milk card mats and layers were used to complete the card.  The finished dimensions are 7" x  8 3/4" in size.  All for now, Sue x


                                                      Follow my blog with Bloglovin