Hello bloggers! It is that time again! The Friday Christmas double days! I know it is still July, but I have so many Christmas card samples to share with you this year, that I need to get started so I can get them all in. I have decided to start with a double bill of the
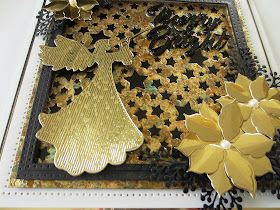
2017 Christmas Angel die. I really love the way she came out and I'm quite proud to show her off! This first sample is quite lavish and totally over the top, but I liked it too. I started by covering a piece of card with a sticky adhesive sheet. I peeled the backing off and covered the page with
Summer Meadow Gilding Flakes. I used the
Twinkle Star Background to cut the stars out of it and backed it with a piece of black gloss card. I did put a few of the stars back into place behind the sentiment to help make it a bit more readable though. I used the
Double Pierced Noble Squares to make a thin black frame that I added with foam. I cut the
Merry & Bright out of
black gloss card and glued it into the upper corner. I cut the angel out of
gold mirror card and added her to the left side of the card. Poinsettias were cut in three different sizes out of gold mirror card and arranged on opposite corners with
Berry boughs cut from black card. White, gold mirror card and black mats were used to complete the card. The finished dimensions are 7 1/4" x 7 1/4" in size. Scroll down for card number two.


Card number two is actually my personal favourite angel card. I started by cutting the
Garland Edger on both sides of the card. I cut two more out of black card and used them as shadows behind the white ones before adding a piece of vintage gold card behind them both. For the focal element, I cut a multi layer frame using the dies from both the
Noelle Frame and the Holy Lattice Frame. I cut the
Twinkle Star Background out of white card and added a black backing to it, then seated the frame over it and trimmed away the excess around the edges. I added that to the centre of the card and cut the
Merry & Bright to go in the middle of it. I cut the
Christmas Angel out of
Vintage Gold card and added her with foam to the side of the frame. Two poinsettias were added to the opposite corner made from the
Poinsettia Additions die set. White, black and vintage Gold card mats and layers were added to complete the card. Finished dimensions are 6 3/4" x 8" in size. All for now, Sue x
Follow my blog with Bloglovin
 Hi crafters! This is another one of my personal favourite cards. I just love the silver and dusty rose colour combo. I started by putting together a background of just silver shine card with a mat of vintage silver card. I cut a wide strip of coconut white card and matted it with vintage silver card and added foam to raise it. I cut the Sumatra die in white to use as the centre of the focal element. Next, I cut the Rose Oval twice in dusty rose card and once in silver shine card. I tucked the sides of the Sumatra die into the centres of the Rose Ovals on either side then cut the silver one in half and added the ends of it behind, but just peeking out of the pink Rose Ovals. I stamped my sentiment and cut it out with the oval centre from the Indonesian tags. I cut another in dusty rose and cut it in half to use as a shadow. I seated the sentiment on the actual tag shape cut out of Vintage Silver card. I added flatback pearls as accents, then finished with matching mats and layers. The finished dimensions are 7 1/2" x 8 1/2" in size. All for now, Sue x


