Tutorials

Saturday, 31 December 2016

Orphan Cards of 2016


Hi bloggers!  Today is traditionally the day each year that I present my "Orphan Cards."  This is the name that I have given to the cards that I make each year that, when finished, they just don't sing to me.  I am not sure what it is about each one, perhaps they just need a bit more, or even a bit less decoration, perhaps the colours are too bright (definitely the case in a few of them), too dull or too dark. The good news is that I don't think there are quite as many as in past years (maybe I am getting better at this card making thing! LOL)  The long and short of it though, is that they are just not my favourite pieces of work, but I know not all of you agree with me on this so they are put up for adoption!  If you would like to win the lot of these, then just leave me a comment to be entered into the drawing.  Do you agree with me on all of these or just a few, let me know what you think?  I will draw a name and post it on the blog on Thursday January 5th.

The winner of this week's Wednesday Card Giveaway is:

Muriel Kelly!!!

Congratulations!  Please email me at americansue1@gmail.com to confirm your address and claim your card!


Follow my blog with Bloglovin


Although this last card isn't an orphan card, I had forgotten to include it with the Christmas cards. Since it is New Year's eve I thought I would include it now so I can wish you a  Happy New Year!!  All for now, Sue x

Friday, 30 December 2016

Thinking Of You

Hi crafters!  I embossed a piece of coconut white card with the Butterfly Dreams Embossing folder.  I inked the edges lightly with Stormy Sky distress ink then ran a bead of Cosmic Shimmer dries clear glue around the edge.  I sprinkled it with Iced Snow then allowed it to dry.  Next I cut a frame using the Double Pierced Noble Circles.  I wrapped the circle frame with Bluebird coloured satin ribbon, tucking the final end to the back of the frame.  I added a single bow to the frame towards the corner of the card and topped it with a white crystal sparkler.  On a separate piece of coconut white card I used a hand cut cloud stencil and added some lightly inked clouds.  I cut several of the Delightful Daisies dies in white and then used spray glue and coated them with Diamond Sprinkles.  I stamped my sentiment in the clouds and arranged the flowers across the bottom so as not to cover the sentiment.  I added mounting foam to the back of the satin ribbon wrapped frame and attached it over the flowers and sentiment.  I completed the card with a white and periwinkle card mat and layer.  The finished dimensions are 7 1/2" x  7 1/2" in size.  All for now, Sue x


                                                         Follow my blog with Bloglovin

Thursday, 29 December 2016

Thanks


Hello bloggers! I started with the background for today's card.  I embossed a piece of coconut white card using the Bed Of Roses embossing folder.  I decide to paper grout it so I spread Polar White Sparkle Texture Paste across the top of it and using a palette knife, I removed the excess so the paste was just laying in the recesses of the design acting as a grout.  I allowed that to dry overnight (although it doesn't actually take that long).  Using the smaller die from the Blossom Edger die, I cut two strips out of white card and backed them with antique silver card.  I added mounting foam to the back and attached them to each side of the card, framing the focal element.  I cut the Mauritius die in white twice and backed both of them with antique silver card.   I crisscrossed them and added them to the centre of the card.  I stamped my sentiment and embossed it in silver.  I cut the centre die from the Mauritius die set in white and used the oval to cut the sentiment out  I stacked them together in the centre of the card.  I completed the card with white, silver, white layered mats.  The finished dimensions are 7 1/4" x  7 1/4" in size.  All for now, Sue x


                                                        Follow my blog with Bloglovin

Wednesday, 28 December 2016

Wednesday Weekly Card Giveaway

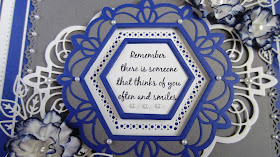
 Hi crafters!  Today's giveaway card is from one of my recent ODS show demos.  I started with a piece of slate grey card and used the scalloped edger die from the Trellis Edger die set on both sides to add a small detail.  I layered that piece on to deep blue card, white card and a wider piece of deep blue card.  I cut the Tahiti die in white and cut it in half.  Next I cut the Bora Bora die in deep blue card, backed it in Slate Grey and cut the centre out.  I added mounting foam to the back and attached the cut Tahiti die to the back on either side.  I cut thee inner die from the Bora Bora in white and seated it in the frame opening.  I stamped my sentiment and cut it out with the centre cutting die from the Fiji die.  I used the centre cutting edges from both the Fiji die and the Tahiti to cut a thin frame out of deep blue card.  Using the Striped Nasturtiums, I cut an assortment of sizes, edged them with Decadent Denim Colour Cloud, spritzed them with water and created three scrunched flowers.  I seated them with leaves cut from the Family Tree die set on opposite sides of the card.  I completed the card with white, deep blue and slate grey layers.  The finished dimensions are 7 1/2" x  9" in size.  Leave a comment to be entered into the drawing to win this card.  The winner will be announced on Saturday's blog post!  All for now, Sue x


                                                         Follow my blog with Bloglovin

Tuesday, 27 December 2016

Shimmery Tree Card


Hi crafters!  Today's video uses the Family Tree die for an almost all white card.  The Pixie Powders provide a beautiful pop of colour for the leaves.


 The finished dimensions are 7" x  7 1/4" in size.  All for now, Sue x