Tutorials

Tuesday, 31 March 2015

Woven and Framed


Hi bloggers!  Finally, the first in the latest series of Crafting My Style videos featuring the newest release of dies.  If you have wondered what to do with the weaving dies, this is the video for you to watch!  It explains how to use the two dies together to create a lovely look.

Don't forget to scroll down to the post below to see if your name was drawn as a winner in the Blog Candy Drawing too!


Buy from Joanna Sheen


The finished dimensions are 7" x  7" in size.  All for now, Sue x


                                                          Follow my blog with Bloglovin

Monday, 30 March 2015

BLOG CANDY WINNERS

Hello again!  It has taken me awhile to get to it, but I have finally gotten there!!  Yes, it is the blog candy drawing that I am talking about (I bet you thought I had forgotten!  LOL)  I do really appreciate your patience on this as I know you have all been dying to see if your name was drawn.  Thank you so much, it is just such a pain when life takes a turn you aren't expecting and throws a nasty cold in the works, isn't it!  So much for my tidy little schedule, huh! LOL  No more waiting now.

The THIRD PLACE Winner is.....................................................................
.......................................................................................................
.......................................................................................
.....................................................................
.................................................
.............................
................
........
..
Jan Paget!!!

The SECOND PLACE Winner is..................................................................
.............................................................................................................
...............................................................................................
................................................................................
....................................................................
.....................................................
....................................
............................
.....................
..............
.........
....
Joanna Dickson!!!

And finally, the GRAND FIRST PLACE Winner is...............................................
...........................................................................................................................
...................................................................................................................
............................................................................................................
...................................................................................................
..........................................................................................
...............................................................................
.....................................................................
...........................................................
...................................................
.........................................
................................
......................
..............
.........
....
Cheryl Brown!!!

Congratulations all!  Please email me at americansue1@gmail.com to confirm your address and claim your prizes.  Everyone's name will roll over into the next blog candy drawing, which will be held when we reach 5400 followers!  All for now, Sue x


With Gratitude

Hello crafters!  I really did try to find a card that doesn't use the New York background to share today (thought you might need a break from it!) but it is everywhere I look!  I started this card by cutting the New York background in coconut white card, then cutting it in half and removing an inch from either side and reassembling it into a square.  I added a thin line of mounting foam to the edges and centre of the back.  I embossed a piece of white card with the Bed Of Roses folder and trimmed it to fit the area behind my background.  I added another set of mats in aqua and white card too.  I glued it to the centre of a larger piece of aqua card and added two offset New York borders to each side as accents.  Next I cut a Copenhagen die in white and added it in the centre of my New York background to hide the cut lines top and bottom.  I stamped the Floral Flourish stamp in back and added a sentiment.  I cut it out with the oval in the Scandinavian Background and inked it with Aqua Adirondack ink before removing it from the die.  I cut a Scandinavian tag in white to add some detail around it and glued bot to the centre of my card.  I adorned the cut outs with white flatback pearls.  I added my usual white pierced mat, followed by a thin aqua mat and a slightly larger white mat layer.  The finished dimensions are 7 1/4" x  9 1/2" in size.  All for now, Sue x 


                                                       Follow my blog with Bloglovin


Sunday, 29 March 2015

Thank You

Good Sunday morning all!  This is about as close to clean and simple as I get.  I do really enjoy this style of card as it is actually more difficult to do in many ways.  For one, you have to make sure you don't leave any smudges anywhere! LOL  That alone is quite a challenge!  It doesn't need much in the way of a descriptive write up, but here goes.  I started by stamping my sentiment from the Justrite Extra Grand Sentiment set in black Archival ink on a piece of coconut white card.  I always start with a slightly larger piece of card so I have a bit of trim room if needed if I stamp it a bit wonky.  Next I used the largest size of the Camellia Complete petal die to cut three apertures in a vertical line down the edge of the card.  I have to admit, I don't measure things, just eye ball them so if you want it to be more precise, then a ruler should be used.  I added mounting foam to the back of the card to raise it for dimension.  Behind each of the three apertures, I added a different colour card, which I had embossed the flower into for more detail.  The remainder of the card is simply matting and layering to add some interest to the simplicity of the design.  I did finish with my signature paper pierced layer mat (just so you would believe I actually made the card! LOL)  The finished dimensions are 7 3/4" x  8 1/4" in size.

Now for the Sunday Comment Game winners.  This week's winners are:

lilysmum!!!
Rolfi!!!
Maureen Killen!!!

For the extra qualifying post of Wed. Mar. 25th, the winners are:

Angela (UK)!!!
Margaret Dixon!!!
Lizzybea!!!

Congratulations all!  Please email me at americansue1@gmail.com to confirm your address and claim your prize.  All for now, Sue x


                                                    Follow my blog with Bloglovin

Saturday, 28 March 2015

You're Special To Me

Hello there crafters!  Another fun use of the New York background.  Poor thing keeps getting cut up in every direction, but it is just so versatile!  I started by embossing my coconut white card using the Bed Of  Roses Embossing Folder (yes, I know I use it a lot, don't I!)  I cut the New York background, also in coconut white card and nipped it in half.  I put the two halves together and cut out a bit more of it so I could make it a bit more square (it isn't perfectly square, just closer to a square than a rectangle now).  I taped the pieces together from the back, then glued them to a piece of periwinkle card.  Next I stamped my sentiment and cut it out with the New York tag.  I cut two of the New York corners in white and another tag in periwinkle blue card.  I nipped the tag in half to make it sorter and  and arranged it and the corners in a pleasing fashion around the sentiment to add more detail.  Finally I finished the card with some white flatback pearls in the corners and middle.  In my usual manner, I finished the card with a white pierced paper mat, a thin periwinkle card mat and a final white mat.  The finished dimensions are
7 1/4" x  7 1/2" in size.

Well, finally up and out of bed after nearly a week and almost human again.  I want the number of the bus that hit me though! LOL  Still tired and very faint headed but slowly getting back up to scratch.  The up side though is that I have lost all the cruise weight now but definitely not the preferred dietary method though! LOL  Thank you for all your well wishes.  I will get the blog candy drawing done and posed on Monday for you.

The winner of this week's Wednesday Card giveaway is:

Evis M!!!

Congratulations!  Please email me at americansue1@gmail.com  to confirm your address and claim your card.    All for now, Sue x


                                                          Follow my blog with Bloglovin


Friday, 27 March 2015

For You

 Hello my crafty friends!  Today's card was a bit of an experiment in partial die cutting.  I was having a play with my Complete Petal Camellias to see if I could use them to create a border.  It is just a nice way to give a sort of whimsical look to your card.  I started by embossing the centre section using the Cross Stitch Pinpoint embossing folder for texture.  Next I lined up several of the Camellias in a variety of sizes on a piece of coconut white card.  Before cutting them, I placed two pieces of white card underneath the edge of them so that those areas would not cut through completely, thereby giving me an attached strip for each of my side borders.  I scored the edge and then glued it to the centre embossed piece, one border on each side.  For the focal element, I cut the Stockholm die out of white card, then backed it with a pretty tanzanite colour (from my stash).  I cut the Copenhagen in both white card and tanzanite card and offset it slightly to look like a shadow.  I nipped this in half and mounted it under the Stockholm die, just peeking out from underneath.  I stamped my sentiment in black and cut it out with the Oslo die centre. I matted it with the Stockholm cut in Tanzanite card.  The card was then finished with a white paper pierced mat, a thin tanzanite mat and a final wider white mat.  The finished dimensions are 7 1/2" x  8 3/4" in size.  All for now, Sue x


                                                            Follow my blog with Bloglovin

Thursday, 26 March 2015

Square Diamonds


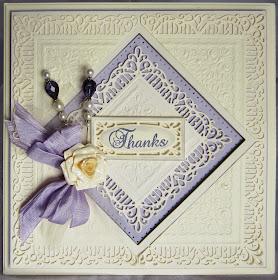
Hello crafters!  Don't forget you can use your dies to emboss with to add a bit of detail to your backgrounds.  Squares also make pretty shapes when used in a diamond orientation.  I hope you will enjoy today's video card.

Buy from Joanna Sheen


Follow my blog with Bloglovin

Wednesday, 25 March 2015

Wednesday Weekly Card Giveaway

 Welcome bloggers!  Another Wednesday card giveaway is upon us!  Fire and Ice for today's offering.  I started with a piece of coconut white card and used the Stockholm die decorative insert to cut a shape out of the top of my card (I didn't use the outside cutting edge with it).  I applied a piece of self adhesive sticky sheet to the front of the card, covering all of it.  I turned the card over and from the back, I gilded the open areas with Summer Meadow gilding flakes.  I used a Rubit Scrubit pad to lightly refine the flakes and remove the excess.  Trim the card to size before removing the backing paper on the front as you will surely pick up a bit of the gilding flakes around the edge.  Peel the backing paper off, then coat with Iced Snow.  Cut two of the Scandinavian Borders out of coconut white card and glue them to the lower portion of the card on top of each other.  Leave the edges loose and push upwards for a ruffly look.  Tie a messy bow out of white seam binding and add in the centre of the border with a glue dot.  Using a Dazzler setting, add Glossy Accents to the bezel, then sprinkle with Gilding flakes.  Use a pokey tool to mix them into the Glossy Accents.  Allow to dry overnight then repeat to make it fuller looking before adding it to the centre of your bow.  Add a pearl strip to the centre of the border on either side.  To complete the focal element, stamp your sentiment in Clear Perfect Medium and emboss with Ancient Copper embossing powder.  Cut it out with the smaller die from the Copenhagen die set, then mat it with the Stockholm die, also cut out of coconut white card.  Add some white flatback pearls in various sizes to embellish your creation.  Finally, add a white paper pierced mat followed by a slightly larger white mat.  The finished dimensions are  6 1/2" x  7 3/4" in size.  If you would like to be included in the drawing to win this card, just eave me a comment and check back on Saturday's post for the winner to be announced.  All for now, Sue x


                                                       Follow my blog with Bloglovin