Tutorials

Wednesday, 30 April 2014

Wednesday Weekly Card Giveaway

 Hello bloggers!  This one may be too dark for some of you, but believe me when I say it is so pretty in real life!  It is a very simple design just to show off the Cascading Fern background by Justrite as it is just lush!  I stamped it on to black card using some flake and glitter glue.  I cleaned my stamp well directly afterwards and let the glue set up until it got tacky (just a few minutes is needed).  I covered it with Calypso Gilding Flakes and used a piece of Rubit Scrubit pad to move the flakes around, then refined them by lightly rubbing in a circular motion.  I just love the bits of rust and teal and copper that are in this mix of gilding flakes, they are so pretty!  Once completely refined, I dusted away any excess flake and covered it the entire piece with a sticky adhesive sheet.  I peeled off the backing paper and covered it with Iced Snow.  This is my Fire and Ice Technique and if you haven't tried it, what are you waiting for! The results are divine!  I matted it with a thin white mat.  Using a piece of 1 1/2" wide rust satin ribbon about 18 inches long, I cut it down the entire length down the centre.  I then added snips into from the woven edge all the way down the length of it approximately every quarter inch or so.  I taped the ends to my craft mat, then used my heat tool to melt each of the cut segments.  I added red line tape to the cut edge of the ribbon and rolled the length of the ribbon to create the flower.  I seated the flower on some gold tulle on my card.  I cut a Faux Quilled leaves die then nipped them apart to add some bits around the flower.  I stamped  small sentiment and cut it out with the tag from the Nested Cloud die set.  I sponged some Perfect Medium on it while in the die, then removed it and added gold embossing powder and heated it.  I tucked the tag under the flower then added a couple of fancy stick pins that I made.  To finish, I added a double pierced white mat with a thin black mat in the middle.  Finished dimensions are 6" x 7 1/4" in size.  Leave me a comment if you would like to be entered in the drawing for this one.  The winner will be posted on Saturday's blog.
  Thank you so much to everyone that left birthday wishes for my Mom.  I didn't want to say anything on the blog  because we threw her a surprise party Tuesday morning at the cafe where we go for breakfast every morning!  She didn't expect it at all especially since we didn't do it on her actual birthday!  Unfortunately, I couldn't get my youngest brother out here for it this year, but I think Mom really enjoyed all the fuss!  I will try to get  a few of the pictures up on Thursdays or Fridays blog post for you!  All for now, Sue x


Tuesday, 29 April 2014

Interwoven Border Card


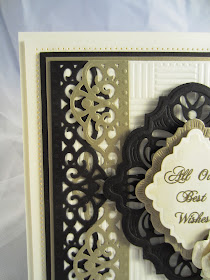
Hi bloggers!  It's Tuesday video day!  I have a favourite to share with you today as I just loved the way this one came out!  I'm sure you will no doubt recognise my black, soft gold and milk card combo that I am so fond of too!  I hope you enjoy it and don't forget to become a subscriber to the Creative Expressions YouTube channel, just click the link on the right side of the blog and it will take you directly to the channel to sign up!  It is ever so easy!  It's a two -fer day as this card has been on the blog before so scroll down to see the second card after watching the video!

Buy from Joanna Sheen


Finished dimensions are 7 1/2" x 8 1/4" in size.

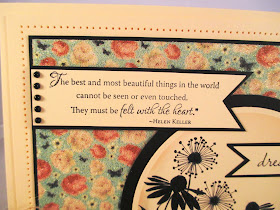
The second card uses the Taylored Expressions stamp set called Discover Your Wings.  I selected a piece of decorative paper from my stash and covered it with a sticky adhesive sheet.  I peeled the backing paper off and coated it with micro beads for texture.  I wrapped a piece of black seam binding around the bottom and taped the ends to the back, then matted the background with a thin black mat.  I stamped the wildflower silhouette in Black Archival ink and cut it out with a simple circle die.  I cut a larger circle to use as a mat.  I taped them together and cut the side off and mounted it against the edge of the background.  I stamped two sentiments and cut them into forked flags going in opposite directions and added them to the card with some black flatback pearls on the edges of both.  I tied a messy bow and topped it with a rose made from the same paper as the background.  I finished the card with a double pierced mat cut from matching peach card.  Finished dimensions are
7" x 8" in size.  All for now, Sue x


Monday, 28 April 2014

Friends Forever

Morning all!  I love the sheer simplicity of this one, although I had to fight myself not to add some flowers to it! LOL  I stamped black card with the Beaded Elements swirl using a clear Perfect Medium pad and heat embossed with black embossing  powder for a tone on tone look.  Background sorted!  On a piece of coconut white card, I stamped the Birdsong Meadow using a Black Archival ink pad.  I used the outer die from the lovely Cordoba die set and cut it out.   I cut a small circle out of copy paper and placed it in the upper corner.  Using Mustard Seed distress ink on a piece of cut 'n dry foam, I inked around the circle by lightly pouncing around it rather than the usual circular motion.  This is because it is very easy to get underneath the edge of the copy paper otherwise.  As I moved outwards from the starting point, I added Spiced Marmalade then Barn Door Distress inks and blended the colours into each other.  I removed the circle which created a white void and stamped my sentiment in black across it.  I mounted it up on foam for dimension an added my pierced mats to complete this simple card.  Finished dimensions are 7" x 8 1/2" in size.  All for now, Sue x


Sunday, 27 April 2014

Just Wanted To Say Hi

 Good Sunday morning all!  I hope everyone has had a good week and is enjoying a relaxing (crafty) Sunday!  It's my Mom's birthday today but I can't share her card as I have used some of my second release dies for it!  However,  I'm happy to share today's card as it shows yet another way to use your Classic Rose die set!  Working from the back, I used the Quilted Flower embossing folder and inked the negative side with Aqua Adirondack ink to letterpress my coconut white card.  Once I got it inked evenly, I lightly spritzed it with water to reactivate the ink a bit, then ran my white card through.  The ink transferred to the floor of the design giving it a soft aqua hue.  For the focal element, I used the Floral Lace Background and stamped it on Aqua card using a Clear Perfect Medium pad.  I heat embossed the image with white detail powder.  I matted it with a thin white and black mat and black seam binding around the opposite corners.  I added foam to the back for dimension before attaching it to my letterpressed background piece.  For my sentiment frame, I used the Ribbons and Swags stamp in black, cut it out with Vintage Labels seven and inked through it with Aqua ink.  I stamped my sentiment and cut it out vertically with a smaller Labels Seven die.  I inked it as well with aqua before removing it.  I tied a messy bow out of black seam binding and added it to the lower corner.  Using the Classic Rose die, I cut several of various sizes and inked the edges with aqua ink then snipped into them at each of the inward scallop areas.  Using a flower shaping tool, I shaped each of the petals to give them a rounded appearance before stacking them up and offsetting them.  This gives a Camellia appearance to the flowers when you leave them open like this.  I added a small Dazzler to the centre of the largest one and used flatback pearls in the middle of the four smaller flowers.  I seated the large flower on my bow with some Bakers Twine.  I made some matching stick pins by gluing my beads to the Creative Expressions blank pins with Glossy Accents and allowing them to dry well.  I finished the card with a pierced white mat, a thin black mat and a final white mat layer.  Finished dimensions are 7" x 8 1/2" in size.

A quick message before I get to the Sunday Comment Game winners.  I am part of the Creative Expressions team and only use their products exclusively.  I do not endorse other companies products and for that reason,  find it difficult to have comments left on the blog suggesting them to others to buy.  I ask that you please understand and respect the fact that I may have to delete those comments from time to time as I would not want others to think that I am endorsing products other than the ones that I personally use.  I haven't a problem with anyone that wants to leave a comment suggesting any of the Creative Expressions products.  I am also more than happy to answer any questions that I may have missed in a blog post if you email me directly.

Now on to the winners and there are lots of them this week!  They are:
Sue Dix!!!
Veronique L!!!
Angela Allen!!!

For the extra qualifying post of April 20th, the winners are:
Caron 28!!!
Kate's Cards!!!
Jean Flowers!!!

For the extra qualifying post of April 21st, the winners are:
Linda28!!!
Granny Smith!!!
GeeBee88!!!

For the extra qualifying post of April 22nd, the winners are:
Nina Spear!!!
Sonja W!!!
Mary Burton!!!

For the extra qualifying post of April 23rd, the winners are:
Serene Polly!!!
Sonja Hopkins!!!
Alison D!!!

For the extra qualifying post of April 24th, the winners are:
Nuttinanni!!!
Jayne S!!!
Gwen70!!!

For the extra qualifying post of April 25th, the winners are:
Beverley W!!!
Jackie Durrant!!!
Sue Dunn!!!

Congratulations all!  Please email me at americansue1@gmail.com to confirm your address and claim your prize.  All for now, Sue x


Saturday, 26 April 2014

Celebrate

 Hi bloggers!  Tan, taupe and black and the Cascading Fern background stamp are the mains for this card.  I stamped it in black on tan cardstock.  I left a small edge on it and then cut a piece of black card as a mat.  I decided to bling up the edges with some of the new Midnight Snow so I laid a bead of Cosmic Shimmer dries clear glue all the way around the edge and coated it with the Midnight Snow and left it to dry.  Next I cut an aperture in the middle of the stamped background.  I stamped the Cascading fern again, but this time on black card using a clear Perfect Medium pad.  I heat embossed it with black powder for a tone on tone look.  I mounted the background on foam and centred it over my tonal version.  I wanted to accentuate the opening a bit more so I used the Cupcake stand Label die with the Vintage tag on the inside to create a frame.  I mounted it on foam and placed it over the aperture.  Next I used the Nested Cloud die set and cut a very thin frame out of the two largest sized dies using black card.  I glued it over my frame for a bit of extra detail and added flatback pearls to the scallops.  I wanted to add a small floral element so I made three small melted satin flowers from some black satin ribbon.  I glued two pieces together for each flower and added a pearl to the centres.  I seated them on some gold tulle and made two stick pins to match my card.  Finally, the backing mats were added out of taupe and black card with my usual pierced layer on the inside.  Finished dimensions are 6 1/4" x 7 1/2" in size.

Now for the winner of the Wednesday card giveaway!  The card goes to:

Sheila Lampard!!!

Please email me at americansue1@gmail.com to confirm your address and claim your card.  All for now, Sue x


Friday, 25 April 2014

On Your Special Day

Good morning all!  I have bunches of wedding samples from my shows a few weeks ago so I thought I should start feeding them in here and there.  I picked out a piece of gold decorative paper from my stash for this one and cut it on the diagonal.  I used the Fudge embossing folder to add texture to a piece of coconut white card, then glued my decorative paper to the bottom of it.  I used six gold satin roses as a diagonal border between the two pieces. I tucked some Faux Quilled Leaves in and around along with some white pearl string pieces to give the border a more romantic feel to it.  For the top focal element, I cut several ovals, one white, one gold to mat as the background pieces.  On white card, I stamped the wrought iron corner  (part of the singles range from Creative Expressions) and heat embossed it in white for a tone on tone look.  I cut this out with a slightly smaller oval and layered it up.  I stamped my sentiment and heat embossed it with gold detail powder.  I cut this out with the Splendid Circle die.  I did one more of these dies in gold and then offset it slightly behind my sentiment to complete the focal element.  I finished the card with a white paper pierced layer and a soft gold mat sandwiched between my final white mat.  Finished dimensions are 7" x 8 3/4" in size.  Got a wedding to go to soon? You might like to make this one.  All for now, Sue x


Thursday, 24 April 2014

White Wedding


Hi bloggers!  Such a simple and elegant card today for you.  Perfect for a wedding or anniversary or any special occasion really.  I have added a second card for you today since this was part of the sneak peeks for the blog release in Feb.  Don't forget to click the subscriber button on Youtube so you can be notified when any new videos are uploaded!

Buy from Joanna Sheen


Finished dimensions are 7" x 8" in size.  Now on to the second card today as promised!

A coffee card from the shows back in February.  I started by creating a background using my score board.  I made a wide border by scoring around the square of coconut white card.   I cut a small square of periwinkle card  and stamped the "steam" swirl in the middle then used the Tied Together folder on it.  I added pearls to each of the embossed junctions and inked the edges with some picket Fence distress stain.    I stamped the coffee cup from Justrite on periwinkle card and embossed it with white powder.  I cut it out by hand and mounted it up on foam for dimension.  I coloured it with Stormy Sky and Broken China distress inks.  Using the Vintage Floret die, I made a small flower out of vellum and added it over the flower that is actually part of the image on the cup.  I stamped a friendly sentiment then added it to the coffee cup handle with some Bakers Twine.  I used my piercing ruler to add my usual pierced edge to my coconut white mat, then layered a thin mat of periwinkle with a final white mat to complete the card.  Finished dimensions are 8" x 8" in size.  All for now, Sue x