Tutorials

Friday, 28 February 2014

Happy Birthday

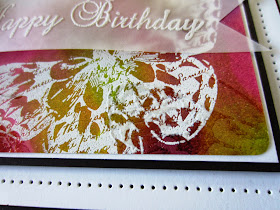
 Happy Friday crafters!  I hope this one will put you in the mood for the weekend ahead!  So bright and cheery isn't it!  Plus I think we have had loads of birthdays this week on the blog so it seemed appropriate for today!  Here's that gorgeous Justrite Butterfly once again, I just can't get enough of it!  If you didn't see the demo of this one last week, here is your recap.  I started with a piece of coconut white card and inked it using three Adirondack inks, Citrus, Wild Raspberry and Purple Twilight.  The Adirondack Brights are more vibrant that the distress inks and that is why I decided to use them instead of my usual (and much loved) Distress inks.  I applied them to the card using a piece of cut 'n dry foam and just did dots of colour all over the cardstock.  Once I was happy that I had saturated the card with enough colour, I dried it well with my heat tool.  This is a very important step so do make sure that it is very dry before proceeding.  I even rubbed it with my anti static pad to remove any hint of moisture that may have been left.  Next I inked the butterfly stamp from Justrite stamps using a clear Perfect Medium pad and stamped it three times, taking care not to overlap them.  I embossed them with WHITE powder (this must be the first powder you use).  Next I stamped the butterfly again in the same manner, but aimed for the open areas more.  You can overstamp the white butterflies and this isn't a problem because this time, we are embossing with clear powder.  If you do the clear embossing first, then the white powder will stick to it and ruin your piece.  If the clear sticks on top of the white, you can't tell so it isn't an issue.  You end up with a lovely textural look from the clear embossed butterflies, almost a ghost image.  I decided to stop here as it was just too pretty.  I matted it in thin mats of white and black.  I made a flower using the Classic Rose die from my new die line and "sugared" it with Iced Snow.  I seated it upon some white tulle and a black jute bow. On vellum, I stamped my sentiment from the Justrite Vintage Rose set using a clear Perfect Medium pad and heat embossed it in white.  I cut it into a strip with a forked end and tucked the other end under my flower.  To complete the card, I made a couple of stick pins using beads from my craft stash and the did some matting with piercing using both black and white cardstock for balance.  I hope I will see that some of you like this one enough to pin it on your Pinterest boards!  Finished dimensions are 7 1/2" x 7 1/2" in size. This one should get you in a cheerful mood, ready for the weekend ahead
A little reminder too, that Julia Watts has shows today on Create and Craft at 8am and 4pm with brand new (and quite lovely) stamps from Creative Expressions.  Her demos will definitely get you inspired to do some crafting this weekend!  All for now, Sue x


Thursday, 27 February 2014

Kraft Lattice


Buy from Joanna Sheen

Hello my crafty friends!  Today's video will show you another way to create a unique background for your special card projects.  I do hope you can take a few minutes to watch, relax and enjoy!


Finished dimensions are 8" x 8" in size.
All for now, Sue x


Wednesday, 26 February 2014

Wednesday Weekly Card Giveaway

 Hello bloggers!  I thought that I would select one of the cards from my recent show for the giveaway today.  So if you like it and want to be included in the drawing, just leave me a comment today.  This one didn't get a lot of camera time either so at least you can get a better look at it on the blog before it goes to a good home!  I started with the Tufted Background by Justrite Stamps and inked it with a clear Perfect Medium pad.  I stamped it on to blush card and heat embossed with white powder.  Using the matching Labels Seven die, I cut an aperture out of the centre.  I used Victorian Velvet to give a bit of shading to the edges and added mounting foam to the back.  I stamped the Hydrangea Label in black Archival ink on blush card and cut it out with the matching Vintage Labels Seven die as well.  I coloured the flowers with Victorian Velvet distress markers and stamped my sentiment in the middle of the label.  I matted the background with a thin black mat, which left a recessed area for my label shape to be glued back in to the centre.  I cut some flowers using the Majestic Morning stamps and die from Heartfelt Creations and layered up several of the flowers to use as accents.  I added them to the card in a cluster with some foliage cut in white and a black jute bow.  I added some Iced Snow to the foliage leaves.  I finished the card by adding 3mm flatback pearls to the cross lines in the background. The final touch was a pierced mat layer with blush and black layers before adding my final white mat.  Finished dimensions are 6 1/2" x 7 3/4" in size.  All for now, Sue x


Tuesday, 25 February 2014

Gold Opulence


Hi crafters!  I think that gold and black are such a rich combo and this card is no exception.  I hope you like today's card and don't forget that you can subscribe to the Creative Expressions You Tube channel and get notifications of all my videos as they are posted on You Tube.  Please leave me a comment if you like the videos too!
You can also use the "pin" button at the end of every post to save pics of the cards that you like on to Pinterest, so please feel free!

Buy from Joanna Sheen


Finished dimensions are 6 1/2" x 8" in size.  All for now, Sue x


Monday, 24 February 2014

Spanish Background

 Morning all!  I think this is my favourite sample from the Coffee Cup set from Justrite.  I absolutely love the Background die from the Spanish Collection and I think it makes a beautifully detailed background for this card.  All of the backgrounds in my new die line have been designed without an outside cutting edge.  The reason for that is so you can decide just how wide of a border you would like for your project.  I love to mount backgrounds up with foam and sometimes there is very little room to do this easily.  I cut this background and left a nice border, enough room for both mounting foam and a pierced edge accent.  I ran a bead of Cosmic Shimmer dries clear glue around the edge and sugared it with Iced Snow for a little bit of bling.  I stamped my sentiment using a black Archival ink pad and cut it out with the California Collection Decorative Frames Set B.  This is another of my favourites as it is large enough for just about any sentiment or stamped images, but has a really pretty decorative edge to it.  While still in the die, I inked it with Shaded Lilac distress ink.  I do have to say that in real life, this card matches nicely but lavender and purples sometimes photograph as different shades of blue so it does look like I have used a different colour for the coffee cut.  I stamped the coffee cup in black and coloured it with the matching Shaded Lilac Distress Marker and Tattered Rose for the flower and then fussy cut the image.  I mounted it with foam just below my sentiment.  I tied a messy bow with mauve seam binding and added a small pearl embellishment to the centre and two fancy stick pins that I made (I made a bunch of these in all sorts of colours so you will be seeing them quite often.).  I mounted the background over a piece of pale lavender card for just a hint of colour peeking out through the background.  A double white mat with a pierced inner frame finished off the card.  This is just the sort of card I would love to give or receive!  Finished dimensions are 6" x 8" in size.

Now to announce the winner of the new Creative Expressions project book!  The winner is:

Cinders61 (Gillian)!!!

Congratulations!  Please email me at americansue1@gmail.com to confirm your address and claim your project book!  All for now, Sue x


Sunday, 23 February 2014

With Kindness Rose

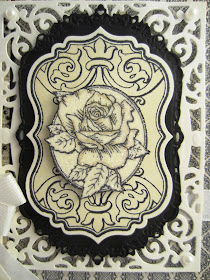
Good Sunday Morning!  It's showtime today at noon for me on Create and Craft and here is a look at another one of the stamp sets from the show.  It is called Rose Vintage Labels Seven by Justrite Stamps.  I picked some papers from the Teresa Collins paper pack that is exclusive to Creative Expressions to use as my background for the card.  The pretty random word paper made a great matching border strip to the background paper so I just matted it with a thin mat of black card.  In milk coloured card, I cut Becca Feeken's Filigree Delight as a smaller background for my focal element.    I stamped the Rose on milk card twice using a black Archival ink pad.  The first one I cut out with the matching Labels seven die and inked through the die with Antique Linen Distress ink.  The second one, I covered just the centre rose section with a piece of sticky self adhesive sheet and then cut it out by hand.  If you hold it to the light it is very easy to see through to do this.  I peeled the backing paper off and covered it with Diamond Sprinkles.  Using an Antique Linen Distress marker I was able to add shading to the rose on top of the Diamond Sprinkles so it matched the rest of the design underneath.  I mounted it on foam for dimension.  I cut a Gold Labels Four in Black to mount the entire rose piece on top and then in the centre of the Filigree Delight.  I added a messy bow tied from chalk seam binding and topped it with a little cream flower from my stash.  I stamped a sentiment and cut it out with one of the tags from the show and tucked it under the bow.   I finished the embellishing with two pretty stick pins that I made and some black rhinestone swirls.  The matting and layering was added last, first a pierced inner layer of milk, then a thin black and a final milk coloured layer to complete the card.  Finished dimensions are 7 3/4" x 7 3/4" in size.

We have a large bunch this week for the Comment Game winners since we had several extra qualifying posts.  The winners this week are:

Evelyn Sinclair!!!
Clai01!!!
Auscrafts!!!

From the extra qualifying post of Feb. 16th, the winners are:

Val Jones!!!
Janice Robinson!!!
Marianna Hammer!!!

From the extra qualifying post of Feb. 19th, the winners are:

Sandie chick!!!
Sioux P!!!
Vanessa Lee!!!

From the extra qualifying post of Feb. 21st, the winners are:

Crafty Suetoo!!!
Maria Illsley!!!
Brooke b!!!

Congratulations all!  You must email me at americansue1@gmail.com to confirm your address and claim your prizes!  Don't forget to check back tomorrow to see if you have won the new edition of the Creative Expressions Project Book (just hot off the presses!)  Hope to see you at noon until 2pm today on C & C as well!  You can watch online at www.createandcraft.tv if you don't live in the UK, but the shows are live so you will have to work out the time difference to see them as they air.  They can also be watched in taped form one hour after the show has aired live by clicking on the arrow next to the show in the schedule.   All for now, Sue x


Saturday, 22 February 2014

Coffee With A Friend

Hello my friends!  Here is another sneaky peek for the Show on Sunday.  This one uses the new  Coffee Cup stamp set by Justrite stamps!  This new embossing folder is not in stock just yet so it isn't on the Sunday show, but I promise to have it on the next shows that I am doing in March.  I embossed the background using the new Art Deco Fanfare folder using milk coloured card.  I added a tone on tone border cut from my California Collection border set.  I thought it would look pretty with a row of cream pearls to accent it.  I stamped my sentiment and coffee cup on to some decorative paper that I had in my stash.  It was stamped with a Coffee Archival ink (appropriately enough) to give it a soft vintage feel.  I stamped the coffee cup a second time and fussy cut (by hand) it out and mounted it upwards.  I stamped just the flower on the cup again and cut and mounted it upwards as well.  I added a tiny bit of shading with a Tattered Rose distress marker.  I made several roses in differing sizes using the Classic Rose die set from my Finishing Touches range.  You can easily do this just by following the paper rose tutorial at the top of my blog and just substitute the die shapes for the stamped images.  They are the same shape!  I "sugared" all three with Diamond Sprinkles and then seated the largest flower atop a messy bow that I tied from two colours of seam binding (Mimi Brown and London Tan) and I added a jute twine bow in cream too.  I placed the two smallest flowers in the opposite corner on the same jute.  I made a couple of stick pins to match  from beads in my stash and put the ends into the knot on the bow.  Finally I finished the card with a some swirl pearls and a pierced mat, then a thin brown mat and a final milk coloured mat.  The finished  dimensions are 7" x 8" in size.

Now to announce the winner of the Wednesday Card Giveaway!  This week's card goes to:

Mrs. B!!!

Congratulations!  Please email me at americansue1@gmail.com to confirm your address and claim your card.  Don't forget to check if you are a winner tomorrow as there will be quite a large list this week!  All for now, Sue x