Tutorials

Friday, 31 August 2012

Sweet Thoughts

Hi there crafty friends!  Pretty pastel butterflies today.  They just sort of take your blood pressure right down by looking at them, don't they!  So calming.  I was very impressed with this set of butterflies called Les Papillons, I didn't want to stop using them.  They are a perfect size I think, large enough to be focal and small enough to be an extra embellishment.  I embossed my coconut white card using the Awesome Blossoms embossibility folder.  I cut away randomly at an angle going up from the right to the left side.  I stamped another piece of white card with my sentiment and clear embossed it.  Using Spun Sugar, I lightly inked that corner with my sentiment.  I taped the two pieces together to form my background.  I cut both styles of the butterflies several times for this one, using varying pastel shades for my background butterflies.  All the top lacy parts were cut in white so that I could even tone down the pastel colours even further.  I glued the pieces of my butterflies together only in the centre, leaving their wings to move independently.  I attached them to my card with glue dots a slightly varying angles, but just on the edge of my cut line going up.  I pierced around the edge of the card to complete it for a really quick card. 
Julia Watts has shows today on Create and Craft at 11am and 4pm using new Christmas stamps.  Be sure to tune in and see her exciting new ideas and demos!  All for now, Sue x


Thursday, 30 August 2012

It's Like Mardi Gras!

 Hi everyone!  Do you feel like you have just stepped into New Orleans for Mardi Gras when you look at this card?  I sure do!  I just loved the way the mask from the Venetian Motif set mixes with the harlequin papers from Canvas Corp (these sold out before I even had a chance to show them off!)  I started with a piece of milk coloured card that I embossed with the Venetian embossibility folder.  I lined it up and extended it a bit to fit my needs.  I cut three strips of harlequin card of varying lengths and cut forks into the end of each of them.  I matted them with black card and taped them to my embossed  background.  I cut a vintage lace border for the top of the card and ran it across the tops of my strips.  I cut a Venetian Motif in milk as a background for my mask.  I cut the mask in red and added a matching bow tied from Lipstick red seam binding.  I added my mask with a black boa feather and a couple of gems to my motif as my focal element.  I cut one of the fancy framed tags in black using the centre piece to make a frame out of it.  I stamped my sentiment on milk card and mounted it in the tag frame.  I added some mounting foam behind it for dimension and placed it in the lower corner.  I finished the card with some black rhinestone swirls and paper piercing around the edge.  A little tip too, if you just need a small swirl to use, nip off the ones on the sides of the mask to use as they are perfect!  All for now, Sue x

Wednesday, 29 August 2012

What You Do

 Morning all!  I can barely look at this card without remembering the hours and hours I spent looking for my Venetian Motif die that went missing after the first use!  You see, I had wanted to use it twice on this card, but it decided to play hide and seek with me so I ended up changing the game plan and actually really liking how it came out.  It turns out the die, which still had a bit of sticky tape on it (I get them sent to me attached to a piece of copy paper with the stickiest tape ever!) was stuck between two rolls of seam binding that were on my desk at the time!  It only took me three times sorting through my waste bin because I was certain I had thrown it away by accident.  So this card was a sort of happy accident as it turned out.  I started with a piece of background paper I had (I'd cut it for something else then changed my mind).  I cut two of the Asian borders and glued them facing each other on the side of my card.  I ran a piece of sky blue seam binding down the centre and added a messy bow to the bottom.  I decided to cut one of the smaller dies from the Venetian Motifs for the centre of my bow, kinda cute isn't it!  I added a flatback pearl to the centre and two stick pins.  Now for the focal element.  I started with a large labels 28 in pale blue and a Venetian Motif in milk.  I cut the motif in half and glued it to the top and bottom of the labels 28, clipping the curly edges over.  next I cut an Asian Motif in milk card.  It was far too big so I performed a bit of surgery on it and brought the size down.  I nipped each one of the corners off at the second scallop.  Next I stamped my sentiment and cut it out with Labels 27 turned to an "X" shape.  I then glued my Asian bits to each of the corners so they were peeking out from behind my sentiment.  I added a flatback pearl to the centres of each of the pieces.  I also inked my sentiment with weathered wood distress ink while it was in the die and used a bit of mounting foam to raise it up.  I finished the card with a few pearls in the two right hand corners and pierced the edges.  I was really pleased with it when it was all said and done although I didn't end up finding that die until late the next day!  All for now, Sue x

Tuesday, 28 August 2012

The Finished Flower

Hello crafty friends!  It just seemed fitting to show the card with the actual flowers since I planned on continuing my tutorial from yesterday.  I'll give you a quick rundown on this card first.  I started with a dotty background and added a wide strip of coordinating striped card to which I glued a vintage lace border to the edge.  I cut one more lace border and added it horizontally towards the bottom of the card too.  I stamped my sentiment on milk coloured card and used the Labels 28 die to cut it out, but I offset the sentiment so that it left some room for my large flowers.  You don't always have to centre your wording in your dies, sometimes it is very effective not to!  I inked it with Tattered Rose lightly once cut, then I proceeded to emboss it using the Venetian Embossibility folder side B.  Remember to do this, you cannot close the folder.  Lay your die with the cutting ridge upwards away from the folder, cover with your tan mat, add a few pieces of card as a shim and then your raspberry plate and run it through your GC.  I added two of the flowers made from the Blossoms Five die set atop a messy bow made from chalk white seam binding.  Then I added a couple of swirls from the Venetian set which I inked with Shabby Shutters.  I finished it off with a black rhinestone swirl and paper pierced the edges.

A close up of the finished flowers.  These have been inked with Victorian velvet on the edges of the peach card.

To continue on from yesterday's bud (you can see it in the centre of the pic), you will need to go up one size and cut three of the dies this time.  Ink the edges on both sides with your choice of colour (I have used Victorian Velvet here)

Following the same method as the buds, cut to the centres of each of the three dies and then start to form the petals.  Turn it over and work from the back this time.  Break down the fibres in exactly the same fashion.  Do all three this way.

Turn each one of them over and push the centres inward.  Your petals will be shaped and formed the correct way now.

Proceed to apply the glue.  From left to right, this is the order that you will assemble them and the glue needs to be further up the petals for the first one then down to just a dot in the centre for your final layer.

Starting with the bud (from yesterday), place it in the centre with the split from any of the areas facing the centre of any of the petals, this will ensure that the petals are offset each time.

Working alternate petals, raise them up around your bud.  You will need your glue to be tacky at this point too.  This particular layer is probably the most fiddly one to apply, so don't give up with it.  It will look as if you haven't done it right because the petals are quite a bit taller at this point.  Do the first four and give it a good pinch around the bottom.  Then add the next three to form the beginning of the flower.  If you pinch tightly from below, it will cause the flower petals to form outward and that is what you want.

This is what your flower will look like once you have the first of the dies glued and pinched around your bud tightly.
Now for the second die layer in your flower.  Seat the flower from above in the centre of layer number two.  You have added some glue just a little way into the petal for this one so pinch it from the bottom to get it to move up and around the bud and first layer just slightly.  Remember to offset it as you set it on this layer too so your petals won't all line up in a row.
Here is the third and final layer to your flower.  Offset it as you seat your flower from above onto the final piece.  You can play with the petals a bit and pinch them into place a bit more if you like.  I hope you have enjoyed the past few days of tutorials and put these into use in your own card making projects.  All for now, Sue x

Monday, 27 August 2012

Flower Bud Tutorial

Hi blog friends!  How about back to back tutorials, now there is a first for me!  I had a bunch of emails asking about the buds that I made from the Blossoms Five die set so I thought I would put this card up and give a good explanation with it.  First of all, I was shown this flower while at the Spellbinders.   My only contribution was to just use the buds together as a cluster on the cards.  Depending on what size buds you want to make, you start with either the second or third smallest die in the set.  I do have a teeny tiny bud you can see right at the beginning of the swirl and this was made with the smallest die, but it is a bit challenging because it is so small (not impossible though!).  I'll give you a quick rundown on the card then on to the tutorial.  I embossed the white background using the Venus Crest embossing folder for some texture.  Next I cut two of the Grand ovals (the second size up), one in peach and one in white.  I cut the peach one in half and it will hook into the white one to extend from behind forming a sort of shadow mat.  Next I cut the smallest of the Grand Ovals in white to layer up.  I did a Decorative Labels 27 in peach and cut two Venetian corners to clip on top and bottom.  On top of that I cut a scalloped labels one and pierced around the edge of using the die as a guide and finally I stamped my sentiment and cut it out with a smaller Scalloped Labels One die.  I inked it with Victorian Velvet lightly and embossed it with the Venus Crest folder while in the die.  Remember, you CANNOT close the folder or you will cut into in and ruin it.  Cover it with your tan mat and add a few pieces of card and your raspberry plate to make up the depth.  I added a bit of rose petal American seam binding behind my rose buds and two swirls from the Venetian set as accents.

Here is a close up of the bud cluster from this card.  Follow the steps below to make these buds, they are very easy to do.
To make the largest buds in my cluster above, use the number three size Blossom Five die and cut two of them.  No need to emboss them through the machine as you will be using a tool later to do that.  I find it is easier to ink the edges at this point.  I have used Victorian velvet for my edges (my card is peach coloured).  I ink both sides too because you can sort of see the inside when it is finished.

Next you need to snip into the pieces at each little recess.  Get as far into the centre as you can, but don't allow any of the cuts to meet or you will cut your flower in half!  There will be seven sections when you have done this.  Do both of them the same way.

Using a foam mat below you and either a ball stylus or other sort of rounded tool (even a small spoon will work), you want to break down the fibres in each petal and begin to round it.  I find it easier to even fold the centre of each petal so it has a crease in it, which helps later when you are assembling it.  For the buds, it really doesn't matter which side you use on your flower either.

Next, you need to apply dries clear glue (preferably Cosmic Shimmer brand) to the tops of the petals on the inside and do exactly the same to the second one, but also add a bit in the very centre.  Allow your glue to get tacky for several minutes if you can. 

Once the glue is tacky, begin folding the petals upward by alternating them.  There are seven so you will just pick one of the final two to pull upward, it really doesn't matter which one.  Get these to form the basis of your bud by squeezing them into a point.  If you creased the centre of the petals, this will help here so they can sort of fold around each other.  Once they are stuck, fold the other petals up around the first three (I forgot a pic of this).  This will form the first part of your bud.

Next, set your first bud into the centre of the second die you cut, but turn one of the sections that is overlapped so that it will sit in the centre of a full petal on this die (does that make sense?).  In other words, you will be offsetting this one so the new petals will cover the areas not covered by the petals in the first bud.

Again, repeat it the same way by alternating the petals as you go.  Continue until you have all the petals tightly gathered.

And finally you will have a nice bud.  Here is a close up of mine (the glue is still wet and showing!)  I like to add a little more colour at this point using a piece of cut and dry foam and sponging just the top for a more intense colour.  I hope you have enjoyed the tutorial on bud making!  I think we will finish it into a flower tomorrow for you. I have winners to share with you today also! 
A pair of tickets to the Ally Pally Big Stamp and Scrapbooking show in Sept goes to: 
Linda Simpson!! 
Jan Dunham!!!
and
Vie Carter!!!
SallysBitz!!!
You will needemail me at americansue1@gmail.com  to confirm your address and claim your tickets!  Please let me know if you won't be able to use them and I can draw another name.  All for now, Sue x


Sunday, 26 August 2012

Easel Tutorial and a Card

Hi everyone, this may turn out to be a rather long post as I have a card (although I picked a really simple one), the easel tutorial and the weekly comment game winners all in this post for Sunday.   The card was an attempt to do a rather masculine looking sample using the basic lattice background die.  I had this overwhelming urge to use my PVA glue and dot all the cross areas on the lattice (so I did!)  When it was finished and dry, I just wanted to touch it so I decided not to cover them with too much so I simply stamped a sentiment and cut it out with my Vintage Lace accent die (maybe a bit frilly for a guy, but I just love the way that die looks).  The rest of the card is just a bit of matting and layering with a pierced edge.  I added in a thin mat of white to balance the die cut sentiment a bit, but other than that it is truly a simple, quick easy card to make in a pinch.  You can see the black PVA glue dots on the black background below.

It seems that I didn't do this demo enough times as I have been inundated with requests for a tutorial on it.  It is really very simple and I have taken a series of pics for you so it should be very easy to recreate.  Starting with your cutting plate on the bottom, place a piece of heavyweight card (at least 240gsm, although a bit heavier would be preferable).  Place your Labels 28 die with the cutting ridge towards your cutting plate and card.

Next, you are going to lay a strip of card about an inch to an inch and quarter wide across the centre of the  die.  If your card is not heavyweight enough, you will cut right through this and your card below and it will not work.  If in doubt, use two strips of card stacked on top of each other.  The point to this is stop your die from cutting this section, but allow it cut cut everything else.

Next, skip a size in your die set and use the next one down (I have shown my set to the left with the largest one missing, then I skipped a size, then the next one is missing) and lay that in place over the strip but lined up the larger die.  Tape these in place to keep them straight.  Cover this with your base plate and run through your Grand Calibur machine.

The picture to the right is what you will have when you remove your die from the plates and discard the strip.  You can see where it has left an embossed area in the centre, but it has not actually cut all the way through there .

Next, Fold the two outside edges upwards from the point where they are attached in the centre.

Place double sided sticky tape in the centre and attach to the back of your card.  Depending on the weight of the card you have used and how sturdy the card is, attach it about a half inch from the bottom.  You can attach higher if your card weight is thick enough to support your card leaning back further.  You can also cut two of the easels and then use double sided tape to adhere them to each other to get a sturdier easel if you chose to do so.  Also, this will work with some of the other similar shaped dies too if you do have Labels 28.  You will just need to play around with some of the more rectangle shaped ones.  I hope that helps but if you have any questions you can email me at americansue1@gmail.com  and I will be happy to answer you. 
 
Now for the weekly comment game winners (I told you it was going to be a long post!)
The winners are:
Linda Jones!!!
Marion Turner!!!
Bosquie!!!
 
Congratulations all!  Please email me to confirm your postal address and claim your prize!  Don't forget to check Monday's post to see if you have won tickets to Ally Pally!
 All for now, Sue x


Saturday, 25 August 2012

Double Cut Aperture Card

Hello everyone!  Today's card uses both of the extendable backgrounds, but in completely different ways.  I was hoping to just illustrate how you can use your dies in various pieces rather than always in the whole.  I cut the lattice background in white to add some interest to my background.  I added it over some teal card so it would really stand out.  Next I used the Decorative Labels One to cut my aperture.  I used it twice to cut an extended opening to accommodate my lattice and give room for my flower and my sentiment tag.  This is very easy to do as you line the die up to one side and cut, then move it over but make sure the second cut overhangs the first cut area.  I mounted the black aperture piece with foam and did some faux stitching with the white Inkssential Ranger pen.  Next I cut two Vintage Lace borders from teal felt.  I added the redline tape to the bottom edge and rolled it and gathered and pleated as I went.  This creates a nice full flower effect.  I mounted it with glue dots in the lower corner with a messy bow tied from white American seam binding.  I cut the Botanical swirl background out of coconut white card.  I decided to nip away at it so I ended up with a nice sweeping swirl to use.  I mounted this coming out from underneath my flower and another small piece above my flower.  I stamped my sentiment and used one of the tags from my Vintage Lace set.  I inked it with Broken China while in the die, then cut one more out of black card.  I split in down the middle end to end and mounted it under each side of my tag as a shadow mat.  I decided to mat the whole card in white and I pierced the edges of the inner mat to finish it off.  How's that for a great big flower!  By the way, in case you missed yesterday's post,  I am giving away a couple of pairs of tickets to the Ally Pally show in London to someone leaving comments on today's and/or tomorrows posts, in case you are interested!  All for now, Sue x


Friday, 24 August 2012

Winners and Exciting News!

Hi guys!  Welcome back today.  I finally got everything caught up to do the blog candy drawing!  First, however, I want to share some exciting news that I was just given.  I have been notified that I was nominated for the Crafts Beautiful Crafting Awards!  I was nominated for two categories: Best Craft Blog and Best Overall Card Designer.  I was very excited to hear the news and want to say a great big thank you for this honour.  The competition is very stiff so I am asking for your help on this to go to the site and vote (sorry to sound like such a politician!).  The link is  http://www.crafts-beautiful.com/craftawards/index.php

Now for the blog candy drawing you have all been waiting for.  In reverse order, as always, the winner of third place is.....................................................
...................................................................
..............................................................
......................................................
..............................................
.....................................
.............................
.................
..............
.........
Teresa Candler!!!!

The Second Place Winner is.............................
.....................................................
.......................................
...........................
..................
..............
..........
.....
....
Kim Williamson!!!

And finally,  the Grand First Place Prize Winner is...........
................................................................................
......................................................................
...............................................................
........................................................
...................................................
........................................
.............................
.................
..........
.....
Rosemarie Fishlock!!!

Congratulations all!  Please email me to confirm your addresses and claim your prizes.  The game rolls over, no need to send your address if you have done it at some point.  we will draw new winners when we hit 3500 followers!  In the meantime, I have been itching to give something else away so I am going to pick four winners, each receiving a pair of free tickets to the Big Stamp and Scrap Show at Alexandra Palace in London in Sept. from those of you that leave comments on Saturday's or Sunday's posts this weekend (two from Sat and two from Sun).  All for now, Sue x

Yesterdays Flower

 Good morning blog friends!  First of all I would just like to say a big thank you for all your support, kind words and wonderful emails after my POTD shows, I really truly appreciate all of them!  I see that we have reached (and exceeded) the blog candy goal so I will be back later today with a second post listing the winners, so be sure to check back.  For today's card, I thought it would make sense to show the card that yesterdays flower was supposed to have been used for.  You can see how the ultra thick, even though it is "clear" does add a yellowish tint to the flowers.  Sometimes it doesn't look out of place, but with the blue decorative paper I used, it just looked too green for me.  Oh well, I ended up with two sample cards and that is never a bad thing as far as I'm concerned!  Today's card was one of my favourites from the show.  I love blue and brown together, so I was quite happy with this one.  We were supposed to have the silky crush ribbon on the show, but there just wasn't enough of the stock.  I had already made the card so it just didn't get into the "demo" pile.  It is pretty self explanatory though, I think, nothing too tricky here.  I used the Fancy frame Tag Two die templates to create a repetitious look for my sentiment.  I cut three of them with the centre die in place creating little frames for my wording.  I stamped them on decorative backing paper that corresponded to my backing paper.  I think it created a bit of interest without being too overwhelming since the pattern was so fine.  I used a bit of mounting foam on the frames and recessed the wording.  I stacked them horizontally and added some of the brown silky crush ribbon up and down the side.  I tied a double bow and added a matching flower made using Sam Poole's button floral stamps (there is a tutorial I did for these on the Creative Expressions website under the workshop section).  There is a close up below of the flower too.
I added a couple of crystal stick pins and some pearlie bling on my ribbon strip and below my sentiments, pierced the edges and the card came together for me.  I hope you like it! Don't forget to see if your name gets drawn later today!  All for now, Sue x


Thursday, 23 August 2012

More Botanical Swirls

Hi crafty friends!  Well I had wanted to show you some more ways to use the Botanical Swirl die template, but it didn't even last the first hour!  When I first laid eyes on these background dies, I was instantly smitten.  They are just my cup of tea, tickle my fancy, float my boat, I think you get what I mean.  I love the fact that you can make an entire card with just the one die if you want, or add an embellishment as I have done here.  I also love the fact that you can use all of the die, part of the die, or leave parts of the die intact as I have done here for a different look.  Great versatility with these.  Funny story, I made this flower for use on another card, then I decided to turn it into a porcelain flower by dipping it in the melted ultra thick embossing powder.  Well once I did that, it changed the colour a bit but it didn't look right on that card any longer.  So I ended up picking the colours for this card to match my left over unused flower!  It needed a home, I just couldn't set it aside and not use it, could I?  I cut the botanical swirl background out of a sort of dull turquoise card, it is a very muted tone.  I decided to put it against a really warm brown background to show off the cut outs I left in tact.  By the way, the edges of these dies do not cut so you can make a border of any size around it.  You will need to snip them out if you don't want to leave them in as I have done here.  On the cream and black card I showed several days ago using this border, I did snip them away right to the edge so you can see how different it makes the piece look.  I added some seam binding in brown, green gem and chalk white and tied a messy bow and glued my porcelain flower on top.  I stamped a sentiment and used the inside die from the fancy tag set and attached it to my bow with some Bakers Twine from the earth tone set.  I added some edge piercing to finish it off and make a really quick card that can be used for any occasion, don't you think?  All for now, Sue x

Wednesday, 22 August 2012

A Day To Celebrate

Hi guys!  A really simple card today based on repeating a pattern as a background.  The new dies are perfect for this too as they are really interesting shapes.  I cut four of the pieces from the Asian set in black card and glued them in to a lavender square shape, two up, two down.  Then I layered four of the smaller pieces from that set on top but in white for a nice contrast.  I did a bit more matting with white and black for that piece then added my sentiment.  I stamped it in black, embossed it in clear on white card.  Then I used the smaller die in the decorative labels one set and cut a frame using scalloped labels one on the inside.  I added some foam pieces for dimension then mounted it over my sentiment and then in the centre of my background.  That entire piece I put on top of a larger background that I had embossed with the new Asian embossibility folder.  I had to line it up and repeat it to make it large enough, but it is a very easy repeat on it.  I rounded the corners and matted it on white then black.  I added a messy bow out of the mauve seam binding and a fancy button in the centre of the bow to complete the card.  Again, one of those cards that will work in any colour combo and with just about any sentiment you need.  I really like the black, white and lavender myself though!  All for now, Sue x

Tuesday, 21 August 2012

Best Wishes

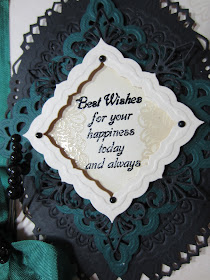
Hi blog friends!  Today is the day for my POTD shows (starting at 9pm on Ideal World) so this is the last sneak peek before you see all the cards that I have been making.  As I prepare for these shows, I put all the products and dies in front of me and try my best to use everything at least once so I can show it featured on a sample.  This card started with the American Seam binding in particular.  This is one of the colours from the sampler pack and I just love it.  It is called Green Gem and it is a very green teal (as opposed to the blue teal I usually use).  I found some matching card in my stash then headed straight for the neutral card pack to go with it.  I stamped the feather from the Design element stamp set using a black archival ink pad, up and down the left side of the taupe card.  This just gave the card a bit of interest since I didn't have any decorative paper that matched.  I added a strip of the teardrop lace in black along the side also and covered the edge with my green gem seam binding ribbon.  I tied a messy bow, added a fancy black button and stick pins and added it with a glue dot to the bottom.  Next I cut the grand decorative Oval die as a backdrop.  I layered it with the Asian Motif cut out of the matching green teal card and a black Venetian Motif.  I stamped my sentiment on taupe card and added a couple of the same feather but this time, I stamped them in clear perfect medium and embossed them.  I used Labels 26 to cut a frame for my sentiment and set it on the diagonal using foam mounting pieces.  I added some of the new flatback pearls to the corners of my frame.  I added a few more black pearls  of varying sizes to the corners and pierced the edges to finish my card.  Are you liking the Green Gem as much as I do?  Hope you can tune in tonight at 9pm or 11pm or sometime on Wednesday for the rest of the shows!  All for now, Sue x


Monday, 20 August 2012

Miss You Times Three

Hello everyone!  Another peek at one of the cards for Tuesday evenings shows.  I did not think that I would have enough time to do justice to this card during a demo so I have opted to just share it with you here instead.  I started with a piece of decorative paper (white background with a small purple print to it, I apologise as I don't recall the company it is from)  I covered it with a Creative Expressions sticky self adhesive sheet.  I peeled off the backing paper and covered it with micro beads.  I rounded the top corners and attached it to some purple card at the bottom.  I cut three Venetian borders, offset them and created a petticoat for the bottom of the card.  I tied some American seam binding around the joining areas and tied a messy bow and added a pearl button embellishment to the centre.  By the way, the colour of the ribbon from the manufacturer is called mauve, but it is as lavender as it comes, very confusing.  Next I cut three of the Venetian motifs out of coconut white card.  Using the piercing holes as a guide, I cut the inside out of each of the motifs.  I interlocked them using their curly cue parts and laid them over a wide strip of purple card with a white mat.  I stamped the tiny "miss you" sentiment in each of the areas. (Yes, my hand slipped a bit in the last one, but I had already glued them down so it is what it is! I really wasn't fussed enough to re-do it!)  I added some swirly pearls above and below my diagonal strip.  I cut one of the butterflies from the Les Papillon set and added it to the corner to complete my card.  I hope you have enjoyed another little taster for the coming shows.  All for now, Sue x