PartiCraft (Participate In Craft)
A daily papercrafting blog which features my handmade cards showcasing Creative Expression's products including my own line of cutting dies and embossing folders, Cosmic Shimmer, Ranger and more which use various techniques and ideas to hopefully inspire the creativity in you.
Tutorials
- Home
- My Ribbon Flower Tutorial
- Fancy Nestie
- Blossoms Five Flower Bud
- Blossoms Five Full Flower
- Easel Tutorial
- Wax Paper Embossing Folder Tutorial
- Caught In Crystal
- Shaving Foam Tutorial
- Quilt Card Tutorial
- Paved Pearl Technique
- Faux Leather Technique
- Plaited Ribbon Wreath Tutorial
- Paper Rose Tutorial
Tuesday 23 April 2024
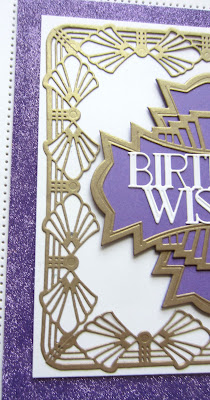
Birthday Wishes
Hello there my crafty friends! I started with a piece of purple card. I ran double sided tape all the way around the edges and coated it with Lilac Polished Silk Glitter. I cut a smaller piece of white card and added it to the middle of the card. I cut the Elegant Fanfare twice. I nipped them apart and reassembled them into a larger square shape and glued them around the edges of the white card. I cut two of the Decorative Tag Duos in antique gold card. I backed both of them with purple card. I criscrossed them in the centre of the card, the cut the Art Deco Birthday Wishes sentiment in white and glued it across the tag. The card was completed with white, gold and purple mats and layers. The finished dimensions are 8" x 8" in size. All for now, Sue x
Monday 22 April 2024
Best Wishes
Hello bloggers! I started with a piece of Arctic Blue card and covered it with a piece of sticky adhesive sheet. I peeled off the backing piece and then attached the large flower from the Floral Extravaganza, cut in white, all around the edge of the card. I filled in the remaining sticky areas with Frosted Sparkle Glitterbitz. I cut the smaller flower in white in two pieces. I attached them on top of the flowers so they were in the opposite orientation as the bottom flowers. I cut the Art Deco Tag Decorative Duo in silver sparkle card and backed it in white. I added it with mounting foam across the middle of the card. I cut the Best Wishes sentiment from the Wordie sheets and added it with mounting foam to the tag. The card was completed with white mats and layers. The finished dimensions are 6 3/4" x 6 3/4" in size.
Sunday 21 April 2024
You're A Real Classic
Good Sunday morning all! I started by cutting the solid Tyre Track die eight times in black. I glued them across the card to create the background. Next I cut a multi-layered frame using the Double Stitched Rectangles. I cut a wider white frame and added a thin black gloss frame on top. I added mounting foam to the back of the frame and attached it to a piece of white card. I added the frame to the background with mounting foam. I cut the Vintage Car in tan card. I used a thin fine lined felt marker to add in all the detail to the car. I used a black marker to colour the tyres and added it to the inside of the frame with mounting foam. I cut the You're A Real Classic sentiment in black and added it to a white shadow backing piece. I added it below the frame with mounting foam. The card was completed with white and black mats and layers. The finished dimensions are 7 1/2" x 8 1/4" in size.
Saturday 20 April 2024
Have A Roaring Good Time
Hi crafters! I started with a piece of Ruby Red card for the background. Using the Fantail Rosette die, I cut it three times out of black gloss card. I cut the ends off off each of them and glued them to the sides of the card. I cut two white mats using the Double Stitched Rectangles and matted them. I added a thin black gloss mat beneath them. I cut the Have A Roaring Good Time sentiment out of black gloss card and glued it to the middle of the card. The card was completed with white, red and black mats and layers. The finished dimensions are 6 1/4" x 8 1/2" in size.
https://www.creative-expressions.uk.com/product/creative-expressions-sue-wilson-art-deco-fantail-rosette-craft-die/
All for now, Sue x
Friday 19 April 2024
Wishes For A Beautiful Birthday
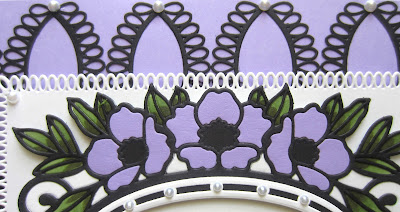
Hello bloggers! I started with a piece of Heather card and cut the Decorative Drapes Border twelve times in black. I glued them to the background in groups o two facing each other across the card. Next I cut the Looped Squares in white and added it to the centre of the card. I cut the Della die with a piece of black card on top of a piece of white card. I coloured the white die cut piece with alcohol markers for the leaves. I glued the black die cut on top of the white one. I cut the die again out of Heather card and used the fall away pieces from the flowers and paper pieced them into the die. I stamped the sentiment from the Sending Sunshine die set and then cut the inner decorative oval to go over it. I trimmed away the excess card and added it to the middle of the die. The card was completed with white mats and layers. The finished dimensions are 7 1/2" x 9 1/4" in size.
Thursday 18 April 2024
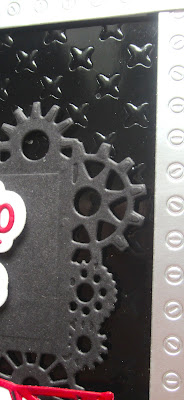
All Geared Up To Celebrate
Hi there my crafty friends! I selected a piece of black gloss card and embossed the Crisscross stencil. I cut the Assorted Tool Border that looks like a slotted screwdriver out of Brushed Silver card four times. I glued it around the edge of the embossed mask design. Next I cut the Industrial Chic Frame & Tag in black and glued it to the background. I cut the Porsche from the Super Cars die set in red. I used a fine tipped felt marker to add in the detail to the car and added a piece of white card behind to fill in the window areas. I used a silver paint pen on the rims and coloured the tyres black. I added the car in the bottom corner. I cut the All Geared Up To Celebrate sentiment in red and added it to a white shadow backing piece. I added it with mounting foam across the Industrial Chic Frame. The card was completed with white, red and black mats and layers. The finished dimensions are 71/2" x 7 1/2" in size.
Wednesday 17 April 2024
For A Special Friend
Hello bloggers! I selected a piece from my background stash to use for the background for today's card. It was created using the Red Oxide and Coral Crush Pixie Sparkles. Next I cut a white oval frame using the Double Stitched Ovals. I added mounting foam to the back of the frame and added it to a white Looped Ovals die cut. Using the Layered Coneflowers die set, I cut multiple flowers out of Cardinal Red card. I cut the leaves and stems out of green card and added brown centres to the flowers. I arranged all the flowers inside the frame and glued them into place. I cut the For A Special Friend sentiment in black and added it to a white shadow backing piece. I added it to the bottom of the card with mounting foam. The card was completed with white and black mats and layers. The finished dimensions are 8" x 8" in size.
Subscribe to:
Posts (Atom)


