All for now, Sue x
A daily papercrafting blog which features my handmade cards showcasing Creative Expression's products including my own line of cutting dies and embossing folders, Cosmic Shimmer, Ranger and more which use various techniques and ideas to hopefully inspire the creativity in you.
Tutorials
▼
Thursday, 31 October 2024
Eat, Drink & Be Scary
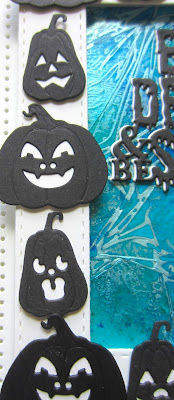
Happy Halloween all! For my final Halloween card, I started by selecting a piece of pixied card from my background stash. I used Aqua Lagoon and Emerald Green Pixie Powders on it, then covered it with a piece of cling film and allowed it to dry thoroughly. I cut a wide white frame using the Double Stitched Rectangles and added it with mounting foam over the background. I cut a large circle out of white gloss card and glued it to the background. I cut the Grim Reaper out of black gloss card and added him with mounting foam on front of the moon. I used the Jack-O-Lantern die and cut an assortment of the pumpkins with different faces out of black card. I added all the pumpkins around the frame. I cut the Eat, Drink & Be Scary sentiment out of both black and white card. I used the white as the offset shadow behind the black die cut then glued it to the upper corner inside the frame. The card was completed with white mats and layers. The finished dimensions are 6 1/4" x 7 1/2" in size.
Wednesday, 30 October 2024
Just Because
Hello bloggers! I brought out the Dots N' Stripes paper pad to start today's card. I cut one inch strips of each of three colours from the paper pad and added them across a piece of card covered with a sticky adhesive sheet. Next I cut two of the Looped Ovals in white and matted them together. I cut Pet Pal Dottie in white and used a fine tipped black marker to colour in her spots and face. I used the blue dotty paper from the paper pad and cut her doggie sweater out of it and glued it on her. I cut a white envelope and added a pink heat and attached it in her mouth. I added her to the Looped Ovals with mounting foam and added some more pink hearts above her head as accents. I cut the Just Because sentiment out of the blue dotty paper then added it to a white shadow backing die cut. I added it with mounting foam to the top of the card. The card was completed with white mats and layers. The finished dimensions are 7" x 7 1/2" in size.
All for now, Sue x
Tuesday, 29 October 2024
Merry & Bright
Hi bloggers! I started today's card by cutting the Moonlight Sleigh Cover Plate out of white card. I selected a pixied piece from my background stash to use as the background. It was created using Aqua Lagoon Pixie Powders. I glued the white die cut to it. I cut the Cover Plate a second time out of Black Gloss card. I used the fall away pieces from the moon and paper pieced it back into the white die cut. Using the Double Stitched Rectangles, I cut a multi-layered frame with a thin black base and a wider white frame on top. I added the frame with mounting foam over the background. I cut the Merry & Bright sentiment from the Festive Wordie sheets and added it with mounting foam across the top of the moon. The card was completed with white mats and layers. The finished dimensions are 6 1/2" x 7 3/4" in size.
All for now, Sue x
Monday, 28 October 2024
Love You Always
Hello crafters! I started today's card by cutting the Floral Harmony Cover Plate die with a piece of black card on top of a piece of white card. I did this twice to create both sides of the card. I used both of the white copies to colour the design with markers. Once coloured, I glued the black die cuts to the tops of both of them. I used an oval die to cut the middle section out buy taping the two pieces together on the back, then lining up the oval die on the top and cutting it. I added mounting foam to the backs, then added both pieces to another piece of white card. I cut the Love You Always Shadowed Stacked sentiment in red and shadowed it with a black die cut. I glued it to the inside of the oval cut out. The card was completed with white mats and layers. The finished dimensions are 7" x 10" in size.
Sunday, 27 October 2024
Hocus Pocus
Good Sunday morning all! On the count
down to Halloween, here is another card. I started with a piece of Pumpkin Orange card. I cut a bunch of the Hocus Pocus sentiment out of white card. I covered the pumpkin card with a sticky adhesive sheet, peeled the backing paper off and laid the sentiments randomly all around the edges of the card. I made sure they were all stuck down well, then coated the remaining sticky areas with Frosted Sparkle Glitterbitz. Next I cut the Looped Rectangle die in white and added it to the middle of background with mounting foam. I cut a white frame using the Double Stitched Rectangles and added mounting foam to the back of it, then added it to the Looped Rectangle die cut. Using he Jack-O-Lantern die set, I cut eight assorted pumpkins and changed up the faces on them. I backed them with a piece of yellow card, then added them to the inside of the frame. I cut the Hocus Pocus sentiment in black and added it inside the top of the frame. The card was completed with white mats and layers. The finished dimensions are 7 1/2" x 8 3/4" in size.
All for now, Sue x
Saturday, 26 October 2024
Tis The Season
Hello there my crafty friends! I selected a pixied piece from my background stash. I used Emerald Green and Pale Olive Pixie Powders all over a piece of white gloss card and spritzed it with water. I covered it with a piece of cling film and scrunched it up and set it aside to dry overnight. Using the Snowflake Floating Frame die, I cut the die into the pixied card. I cut the die a second time out of black card. I used the black die cut as an offset shadow behind the pixied die cut. I cut a circle out of the centre of the background. Next I added small pieces of mounting foam all over the back of the die cut background. I added the background to a piece of white card. I cut the Tis The Season sentiment in black gloss card and glued it to a piece of white gloss card that I cut into a circle. I glued it to the centre of the background. The card was completed with white mats and layers. The finished dimensions are 7 1/2" x 9" in size.
All for now, Sue x
Friday, 25 October 2024
Sending Love & Hugs
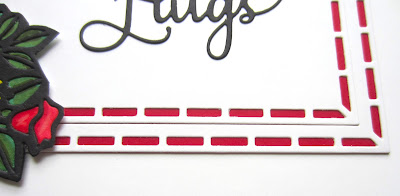
Hello bloggers! I started today's card by cutting the Floral Dream Cover Plate die with a piece of black card on top of a piece of white card. I used the white embossed copy to colour the image. Once coloured, I glued the black die cut on top. Using my scissors, I cut around the floral part of the die, cutting away the more solid area. Next I cut the Stained Glass Rectangles in two sizes out of white card. I used raspberry card behind the rectangles to show through the cut out detail and matted them together. I added them to a larger piece of white car, than added the floral element on to the left side of the card. I cut the Sending Love & Hugs sentiment in black and glued it to the inside of the rectangles. The card was completed with white mats and layers. The finished dimensions are 7" x 8 1/4" in size.
Creative Expressions MASSIVE CHRISTMAS SALE is now on!
Over 1000 products with up to 75% DISCOUNT!
Click the link to see the sale products!
https://www.creative-
All for now, Sue x
 Follow my blog with Bloglovin


.jpg)


