Sunday 30 June 2013

Dear Sister

 Good Sunday morning all!  Unfortunately this is a card that I'll never be able to send as I have no sisters, just three brothers (don't think they would be into this one either! LOL), but it is nice to find a stamp set that has all the different possible combinations that you might need for any family situation.  This sentiment comes from the Just Rite stamps All in the Family set (I love this font too!)  I decided that I would use this pretty blueish purple colour with white for today's card.  Using the Twisted Metal Tag die, I cut an aperture out of a piece of white card.  I re-inserted the die into the aperture after removing the very centre piece.  I taped it from the back, just catching the edge of the die cut with my tape.  I cut a Fancy Lattice piece to go across the opening and taped it to the back as well.  I used mounting foam on the back of this piece to raise it for dimension, then added it to a larger piece of my purplish background card.  I used the tiny Happy Birthday sentiment from the Justrite set called Iris Vintage Labels Four and cut it out with one of the small dies from the Twisted Metal Tag set.  I mounted it in the centre of the lattice in my aperture.  I stamped the larger sentiment and cut it out with another die in that set.  I inked it lightly with Dusty concord distress ink.  I cut a tag from the Fancy Framed tags two set and seated my sentiment on top of it then added it to the bottom of my card.  I made torn paper flowers to cascade down the card.  Using a perfect medium pad, I inked the edges of the torn circles, then dusted them with white embossing powder.  Once embossed, I crumpled them then glued two together to form my flower.  I finished each flower with a flatback pearl in the centre.  I added corners die cuts from the twisted metal tag set in the two corners without flowers.   To complete the card, I added a double white mat and used the white PVA glue from Cosmic Shimmer to frame the edges of the card.  The finished dimensions are 7" x 8" in size.

It's time again for the weekly Comment Game Drawing.  We have two sets of winners this week and the first ones are:
Hilary Smith!!!
Minx!!!
Alison Dent!!!

From the extra qualifying blog post of Wed., June 26th, the winners are:
nmty (Norma)!!!
Clare W!!!
Tracey McIntyre!!!

Congratulations all!  Please email me at americansue1@gmail.com to confirm your address and claim your prize.   All for now, Sue x


Saturday 29 June 2013

Beautiful Birthday

    Good morning bloggers!  Today's offering is an experiment that I tried using the A4 Basketweave embossing folder.   I embossed a piece of soft gold card  for my background.   I wanted a whitewashed look for it so I used some Snowcap Adirondack dabber paint and added a bit of water to thin it and painted it across my embossed background.  I dried it with a heat tool and then lightly sanded it to distress it, giving it a shabby chic look.  I cut a Radiant Rectangle frame from coconut white card to provide a backdrop around my focal element.  I stamped the Justrite Enjoy The Day stamp and embossed it in white, cutting it out with the matching die.  I cut another Vintage Labels 4 in soft gold card, cut it in half down the centre and used it as a mat on either side of my white embossed die cut.  I stamped one of the other stamps and embossed it in gold.  I added my sentiment in black so it would show up and cut it out with the oval die in the set.  I added it to the centre with mounting foam.  For a floral embellishment, I added some white tulle, natural jute twine and a white organza ribbon rose, topped with two pearl stick pins.  I completed the card with a soft gold mat before adding my final double white pierced mat.  Finished dimensions are 6" x 8" in size. All for now, Sue x


Friday 28 June 2013

Silver Buckle Card

 Hi friends, Labels 28 again today but in a lighter fare.  I used a piece of grey tonal patterned paper for my background.  I then cut two of the Blossom Corners from Heartfelt Creations out of coconut white card.  I glued them into place so they created a lacy backdrop for my buckle card.  Using the Labels 28 die set, I cut three frames, two slightly smaller than the centre one. On the larger centre frame, I stamped first using the Blossom Frame from the Stamps To Die For Range and a clear perfect medium pad.  I heat embossed it with Silver Shine Embossing powder, then cut it out with the coordinating dies.  I cut a forked flag and wove it through the three frames and centred it across them.  Next I stamped my sentiment from the All In The Family Sentiment set from JustRite stamps.  I cut it out with the oval from the Radiant Rectangles set.  I used the inner decorative insert die with it for a bit more detail.  While it was still in the die, I used Brushed Pewter Distress Stain on a piece of cut 'n dry foam to highlight the sentiment.  I mounted it with 3D foam across the three frames to complete my focal element.  I added a darker grey mat, then finished the card with a double mat of coconut white card with an inner pierced mat.  I hope you like it!  Finished dimensions are 7 1/2" x 8" in size.

Thank you for all the lovely comments left on the giveaway card day.  The winner is:
Lacelady!!!

Congratulations!  Please email me at americansue1@gmail.com to confirm your address and claim your prize!  All for now, Sue x


Thursday 27 June 2013

You're The Best

 Hi bloggers!  Back to one of my favourite colour combos today, soft gold, taupe and black.  I just think it looks so elegant together, opulent even.   I started this card by simply embossing the background with my Cascading Hearts embossing folder to bring some texture to it.  To add a swirly element to my card, out of soft gold card, I cut two of the Vintage Floret Frame from Heartfelt Creations.  I cut an edge off of both of them and then glued them onto the background side by side so the top edge and the bottom edges were even.  Next I cut a large frame using the Labels 28 die set out of black cards.  I put mounting foam on the back.  I stamped my sentiment using a clear perfect medium pad and heat embossed it with gold powder.  I centred my Labels 28 frame over it and then added double sided tape to the back of this piece and adhered it in the centre of my background.  This piece covered the join in the two Floret frames quite nicely so only the edges peek out.  Next, on black card,  I stamped the Blossoming Frame from the Stamps To Die For range using a clear perfect medium pad.  I heat embossed it with Cosmic Shimmer bright gold powder and cut it out with the coordinating sizes of the Labels 28 die set.  I added mounting foam and laid it atop the larger frame in a stair step fashion.  I tied a double bow out of cream silky crush ribbon.  I added a bow of black jute behind it, a fancy metallic button (from my craft stash|) and a couple of black crystal pins as accents to the corner of my card.  I added cream flatback pearls in 5mm size to the corners and the sentiment.  A black mat added a bit of balance to the card with a double milk mat with an inner pierced layer finishing off the card nicely.  This one would work quite nicely for a masculine card if the bow was omitted.  Finished dimensions are 7 1/2" x 8" in size.  All for now, Sue x


Wednesday 26 June 2013

It's Another Giveaway Day!

Hi my crafty friends!  I think this card is rather doilie-ious  (that was bad, wasn't it!)  But that is just what it reminds me of when you put four of the corners together like this.  Add in some micro beads and it is scrumptious I think!  I started this card by covering a piece of blue card with a piece of self adhesive sticky sheet and then trimming the edges to size and rounding the corners.  Next I cut four of the Heartfelt Creations blossom corner die in coconut white card.  Before I peeled the backing paper off, I laid the corners down to see where the approximate centre of my card was.  I used my pokey tool and poked a small hole in the centre.  I knew that it wouldn't show when the card was finished and it gave me a starting point from which to lay my four dies down.  Next I peeled the backing paper off and used that hole as the place where I first attached the tip of all four corner dies so that they would be relatively straight.  With the sticky paper, you don't really get a second chance.  Once it touches, it is pretty much stuck!  After I made sure they were firmly touching (I use the glossy side of the release paper, lay it over then rub), I poured my micro beads over the top of the entire piece.  I cut out the oval die in the Radiant Rectangle set, also using the smaller insert for more detail to use as a mat for my sentiment.  I stamped my sentiment (from Justrite stamps) then cut it out with one of the smaller sizes of the Labels 18 die set.  Using Stormy Sky distress ink, I lightly inked it while still in the die for an accent.  I mounted it in the centre of my oval, then attach that piece in the centre of my corner dies.  I added some flatback pearls to the card corners and parts of the corner dies as well.  Finished the piece with my customary double white pierced mat.  Finished dimensions are 7 3/4" x 7 3/4" in size.  How about if we do a giveaway on today's card.  Just leave me a comment and I will draw a name from among them to be the winner.  I'll post it up for you on Friday!  It has been absolutely forever since I have been able to do one.  I think it's high time!  All for now, Sue x


Tuesday 25 June 2013

Where There Is Love

Hi my crafty friends!  I love the way this one layered up!  I had this idea in my head and it actually worked when I went to put it all together.  I'll explain but let me start with the background.  It has been embossed with my Lattice Heart embossing folder and I put it on the card the right side up this time! Yeah! LOL  I have used the new 
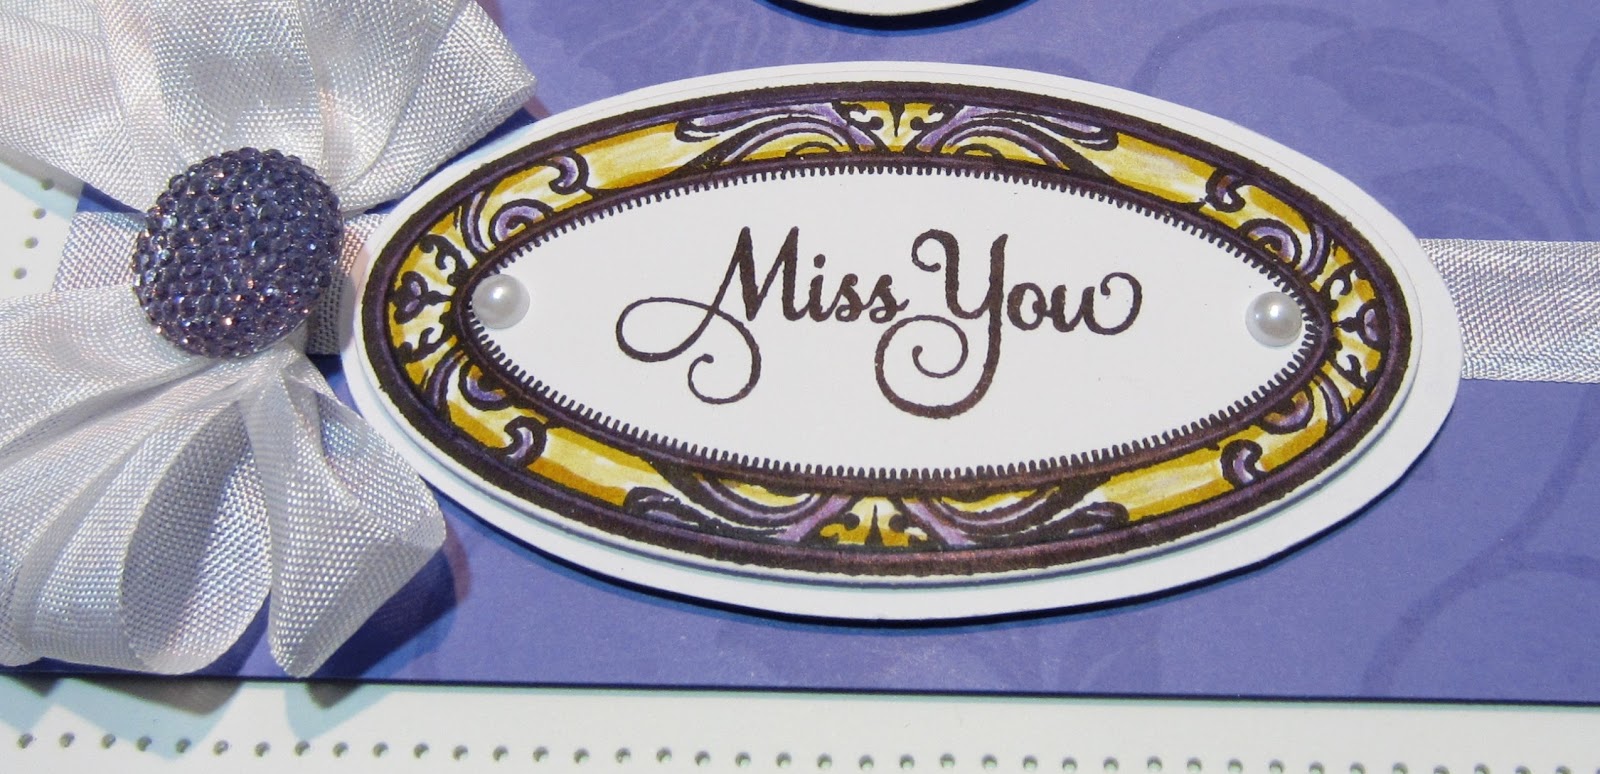
custard card to cut the Enchanted Labels 28 and I used the Labels 28 die to cut the inside to make it into a frame.  Next I cut the Vintage Floret frame in coconut white card.  I nipped a tiny little spot in the corners of the Labels 28 frame and I was able to tuck the corner of the Floret frame underneath.  That is what I had imagined when I started the card and the sizing worked perfectly (don't you just love it when a plan comes together!)  Next I stamped my Petals stamp (from the Stamps To Die For Range) using a clear perfect medium pad.  I heat embossed it with white powder and used a Mustard Seed distress ink to very lightly ink it once I cut it with the matching Labels 18 die.  I stamped my sentiment from the Justrite Enjoy The Day set and cut it out with the oval die in the Vintage Labels 4 die set.  I used the larger oval from the set to cut a custard coloured mat for it and layered them atop my labels 18 die cut.  I tied a double bow with the white frilly edged ribbon.  To finish the centre of the bow, I made a rose (using the method in the tutorial at the top of the blog) and "sugared" it with Cosmic Shimmer Diamond Sprinkles glitter.  I added two white pearl stick pins to complete the bow.  To finish the card, I added a double mat of white card and used the Cosmic Shimmer White PVA glue to make dots around the edge.  Finished dimensions are 6 3/4" x 8 1/2" in size.

On another note, I was chatting to Nigel May before our show on Sunday and he told me about his brand new book called "TRINITY" and I have to admit it sounds fantastic.  He gave me a quick synopsis telling me that it is full of strong female characters and has all sorts of glamour, beauty, murder and deception as well as some saucier bits too.  It even has some shopping telly bits and some crafty references thrown in!  He told me that the reviews of it have called him "the male Jackie Collins" which must be a great honour for him!   I am now desperate to read it, but it is only available as a download.  (not as a published paper book) I thought that I couldn't download it as I don't have a Kindle, but the good news is that I have just learned that it can be downloaded by going to the App Store on my laptop or on an iPad and then downloading the Kindle App (which is free) and opening it in my Amazon UK.  Then just head to Amazon and buy the book there for £1.91     I asked Nigel to send the link to me so I could share it.  If any of you bloggers are interested (like me) the link is http://www.amazon.co.uk/Trinity-ebook/dp/B00CNW8Z00/ref=sr_1_1?ie=UTF8&qid=1372085745&sr=8-1&keywords=trinity+nigel+may  He tells me that it's even available in the States as well for any interested bloggers from across the pond.   If you want more info, all the details are at  www.nigelmay.net/writing     We wish you the best of luck Nigel!   All for now, Sue x


Monday 24 June 2013

The Moments Of Your Life

 Good morning all!  I really enjoyed the shows yesterday and your support was amazing (as witnessed by the emails that were overflowing!)  It is so nice to come back to such a lovely welcoming display!  I thought I would show one of my demo cards today and this one is one of my favourites!  What can I say about that beautiful corner die set by Heartfelt Creations.  It just ticks all the boxes doesn't it!  For those of you that didn't see the demo, I embossed the background lavender card (here I used my Cascading Hearts embossing folder, but on the show I used the Garden Lattice) to give a bit of texture to the background.  After that I cut four of the smaller corners in the Blossom corner set out of coconut white card.  You will need to use a paper cutter to put the sides on these as they don't "cut away" there on the die.  Next I laid them out in a fan shape using glue dots.  Once I was happy with the pattern, I used some Cosmic Shimmer dries clear glue to secure them.  Next I cut  a bunch of the Vintage Florets dies so I was able to make enough flowers to have them cascading down the card on to my fan.  I stamped them all with the matching stamps and a clear Perfect Medium pad.  I used Cosmic Shimmer detail white embossing powder to bring out the detail.  I used a foam mat and gave them a bit of shape with a rounded tool, then put the flowers together using two die cuts and off setting them.  A flatback pearl adorned each of the centres.  I stamped my sentiment on white card and used some Dusty Concord ink around the edges of it.  I cut one of the tags from the Fancy Framed Tags two set using the inside die too and glued it over the top of my sentiment and nipped away the excess card around my sentiment.  I mounted it with foam above my fan and arranged my flowers from it down the card.  I added a messy bow tied from seam binding and I made a tassel from some pastel Bakers Twine and added it under my bow with some tulle.  I added a pearl swirl to the upper corner for a bit of the bling and finished it with a double white mat with an inner pierced layer.  Just a little different idea for your corner dies!  Finished dimensions are 8" x 8" in size.  All for now,
Sue x


Sunday 23 June 2013

Miss You

 Morning my crafty friends!  I am so looking forward to today's shows at noon and 5pm as it feels like absolutely ages since I was last on air!  I don't want to give away any of the demos (see, you have to tune in now, huh!)  but this one is a really nice card that shows some of the stamps on the poll.  I didn't realise until I loaded it on to the blog, but I have actually used a set that is on my shows in July as well (so another sneak peek).  The watermarked background uses the Floral Thank you set by Justrite stamps that will be coming up mid July.  I simply stamped them with a clear perfect medium stamp and did not emboss and you get a lovely watermark effect.  Great for adding interest without being overwhelming I think.  I then stamped the pretty Iris on to coconut white card using a black Archival ink pad.  I coloured the image with Distress Markers using blues and purples and kept the background in honey shades for a nice contrast.  I stamped the sentiment (another JustRite stamp) and coloured it to match.  I cut both of them out using the matching JR Vintage Labels Four dies.  I wanted to dress up the Iris a bit so I cut a Marvellous Square die to seat it upon.  The pretty decorative corners just peek out from underneath.  I tied some seam binding around the bottom of the card and added my sentiment on top of it.  I tied a messy bow and added a lavender Dazzler to it and attached it to the side of my sentiment.  I paper pierced the inner mat of the double white mat to finish off this quick and easy card.  A lovely one for anyone who loves irises!  Finished dimensions are 7" x 8" in size.

Time for the Sunday Comment game winners!  This weeks winners are:

Craftygardener!!!
Oksana!!!
Gail C!!!

Congratulations all!  Please email me at americansue1@gmail.com to confirm your address and claim your prize!!  All for now, Sue x