Friday 31 May 2013

Thinking Of You


 Hi bloggers!  A very unusual colour combo for me today, purple and taupe.  I really like the way they look together but I know it may not be the most popular choice.  I wanted to play with the grosgrain ribbon as I haven't used it in awhile so I selected colours that matched it and that is how I started this card.  I pulled out the lovely new die set called Filigree Delight as the base for my focal element.  I cut the largest die in the set out of purple card.  I layered it on too a larger piece of taupe card, leaving enough room for my ribbon below it.  Next I cut two of the Celtic Motifs out of taupe card.  I scored them across at roughly 1/4inch increments.  I cut to the centre on each of them, then folded them concertina style.  I glued the two pieces together with Cosmic Shimmer dries clear glue to form the rosette and added it in the centre of the Filigree Delight.  I stamped my sentiment using the Deep Purple Archival ink pad and cut it out with the tag from the Filigree Delight set.  I used some of the ink to highlight it while it was still in the die also.  I mounted it with several pieces of foam in the centre of my rosette.  I wrapped my striped grosgrain ribbon around the bottom half of the card and tied a double bow with it.  I added a Dazzler and two crystal stick pins as embellishments to my bow and pearls to the corners of my focal element.  I matted the entire piece with a layer of purple then added a double mat of taupe to finish it off.  As usual, I paper pierced the inner mat with my piercing ruler to give the card a final framed look.  Finished dimensions are 7" x 7 1/2" in size.  I just wanted to let you know that I have a nice surprise planned for Saturday's post so don't forget to visit tomorrow.  I know the weekends are a bit  more hectic so I thought I would give you the heads up about it today!  All for now, Sue x


Thursday 30 May 2013

You Made My Day

Hi bloggers!  Another blush and grey card today (see I told you I loved that combo!)  I started by using one of the heart stamps from the Hearts Entwined set to watermark the background on my blush card.  I used a Clear Perfect Medium pad for this.  I do not emboss it, I just let it dry naturally for this technique.  I had been using the Grateful Lattice die for making some cards earlier the day I made this and had all the leftover pieces on my craft table.  I decided that it might be nice to try to incorporate them into a card.  I used glue dots on the tips of them and made rows of the white and rows of the grey to form a petticoat effect for my card.  I still had a few leftover when finished so I made a flower ( that I didn't use) but that I have photographed at the end to show you too.  To make the flower, I used a big dollop of Pinflair glue and stuck the fall away pieces into it, let it dry overnight then inked it lightly with Spun Sugar.  Back to the card, I tied a piece of flesh seam binding around the card to give a border between my background and my petticoat.  I tied a messy bow and added a pearl embellishment and stick pins.  For the focal element, I used the Opulent Ovals and cut the largest die shape out of mid grey card.  I used the inner dies during the embossing stage too add some more texture to the die cut.  I stamped my sentiment using a clear Perfect Medium pad and heat embossed with silver shine powder.  I cut it out with the oval die from the Radiant Rectangle set.  I used the smaller insert die with it.  I cut another oval die out of white and matted it behind so it showed though the cut out parts.  I mounted it in the centre with foam for dimension.  I added a pearl swirl to the upper corner and a double mat of grey card with a pierced inner mat to complete the card.  Remember to keep some of your fall away pieces for a bit of fun on your next cards!  Finished dimensions are 7" x 8" in size.  All for now, Sue x


Wednesday 29 May 2013

Friends Through Thick And Thin

 Morning all!  I love that sentiment, don't you!  This is a sample from the D-Lite shows awhile back.  I thought I would mix it up a bit today.  This card is one of those samples that I made with a specific thought in mind and that was to show different ideas you can do with your embossing folders.  Here I have used the Pastorale embossing folder to create a frame.  Now, I do need to mention at this point, that this is a Couture Creations folder and they are always limited release and when they are gone, they are gone (for the most part.)  I believe that this particular folder has been sold out for awhile, but I decided to still show the card in hopes of making you look at your own folders in a different way perhaps.  I used a strip section from the folder and turned it into a frame by embossing my card four times so I had enough strips to fit around my focal element.  I trimmed them to size and matted them with aqua card.  I glued them to a piece of card and mitred the corners with my scissors to give me a frame for my background.  Next I stamped my Layered Lace stamp from the Stamps to Die For range using a clear Perfect Medium pad.  I heat embossed it with True White embossing powder.  I cut it out with the Elegant Labels Four die and used the smaller die in the middle to cut a frame.  I didn't emboss it just yet though, but I did remove all the fall away pieces from the die but left it still in the die template.  I glued the die cut to a piece of aqua card while it was still in the die, then I embossed the two pieces.  The aqua card becomes raised into the spaces where the fall away pieces have been removed.  I do hope that makes sense!  I hand cut around the edge of the aqua card, leaving the pretty white die cut edge to show on top.  I mounted it on foam in the centre of my embossed frame.  I stamped my sentiment and cut it out with one of the Petite Labels, inking it very lightly with Aqua Adirondack ink while still in place.  I mounted this in the middle of my Elegant Labels Four frame.  I tied a messy bow from Turquoise seam binding and added a melted ribbon flower made from white silky crush ribbon.  A single pearl adorns the centre and two pearl stick pins as embellishments.  I double matted the entire piece with coconut white card and used Cosmic Shimmer white PVA glue dots all the way around the edge as an accent.  I added a few flat back pearls to the focal element and sentiment piece to complete the card. Finished dimensions are 8" x 8" in size.  All for now, Sue x


Tuesday 28 May 2013

Wonderful Gift

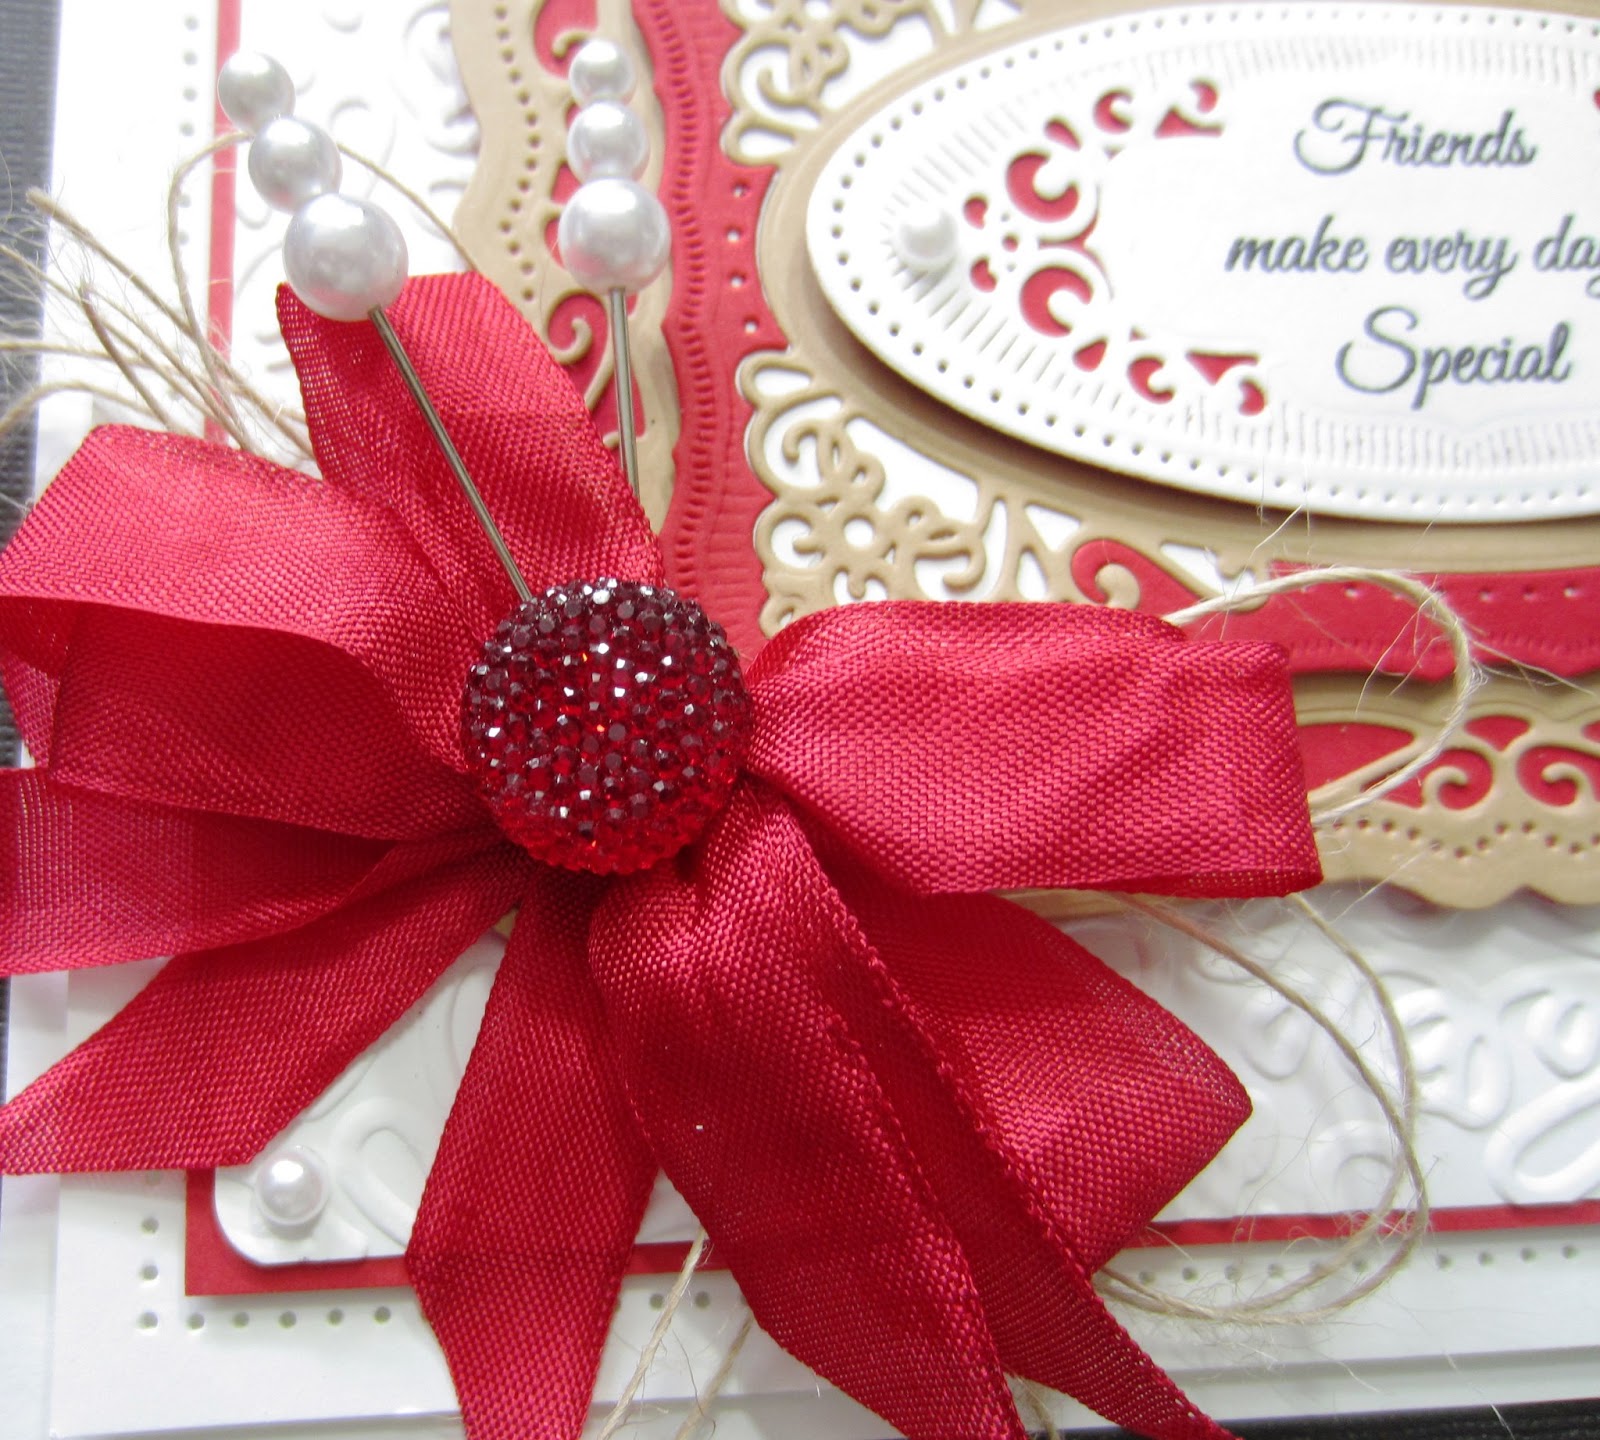
Hello my crafty friends!  I hope that everyone enjoyed a lovely holiday weekend, I know that I did!  In the last week since I returned from Miami, I have been to the Homossasa Wildlife Park and on an airboat ride out through the St. Martens keys off the coast near Homossasa.  Both were spectacular, so much fun and the weather was amazing! I have loaded a couple of pics from the week which I tried to put at the end of the post, but they have ended up right in the middle of my card pics!  They weren't playing nice and didn't want to move! Sorry about that!

  I haven't gotten a lot of crafting done this week, but I hope to play catch up this week.  Here is a lovely little card that I made for the last shows I did in March.  I started with the sky blue card and cut an aperture in the top of it using one of the dies from the Radiant Rectangle set.  On the bottom of the piece, I cut a triple border using the lattice insert from the Bracket Border die set.  I used the cutting edge on the bottom to give my background a pretty defined edge.  Next I stamped my Flower Frame Stamp To Die For using a Black Archival ink pad on to 
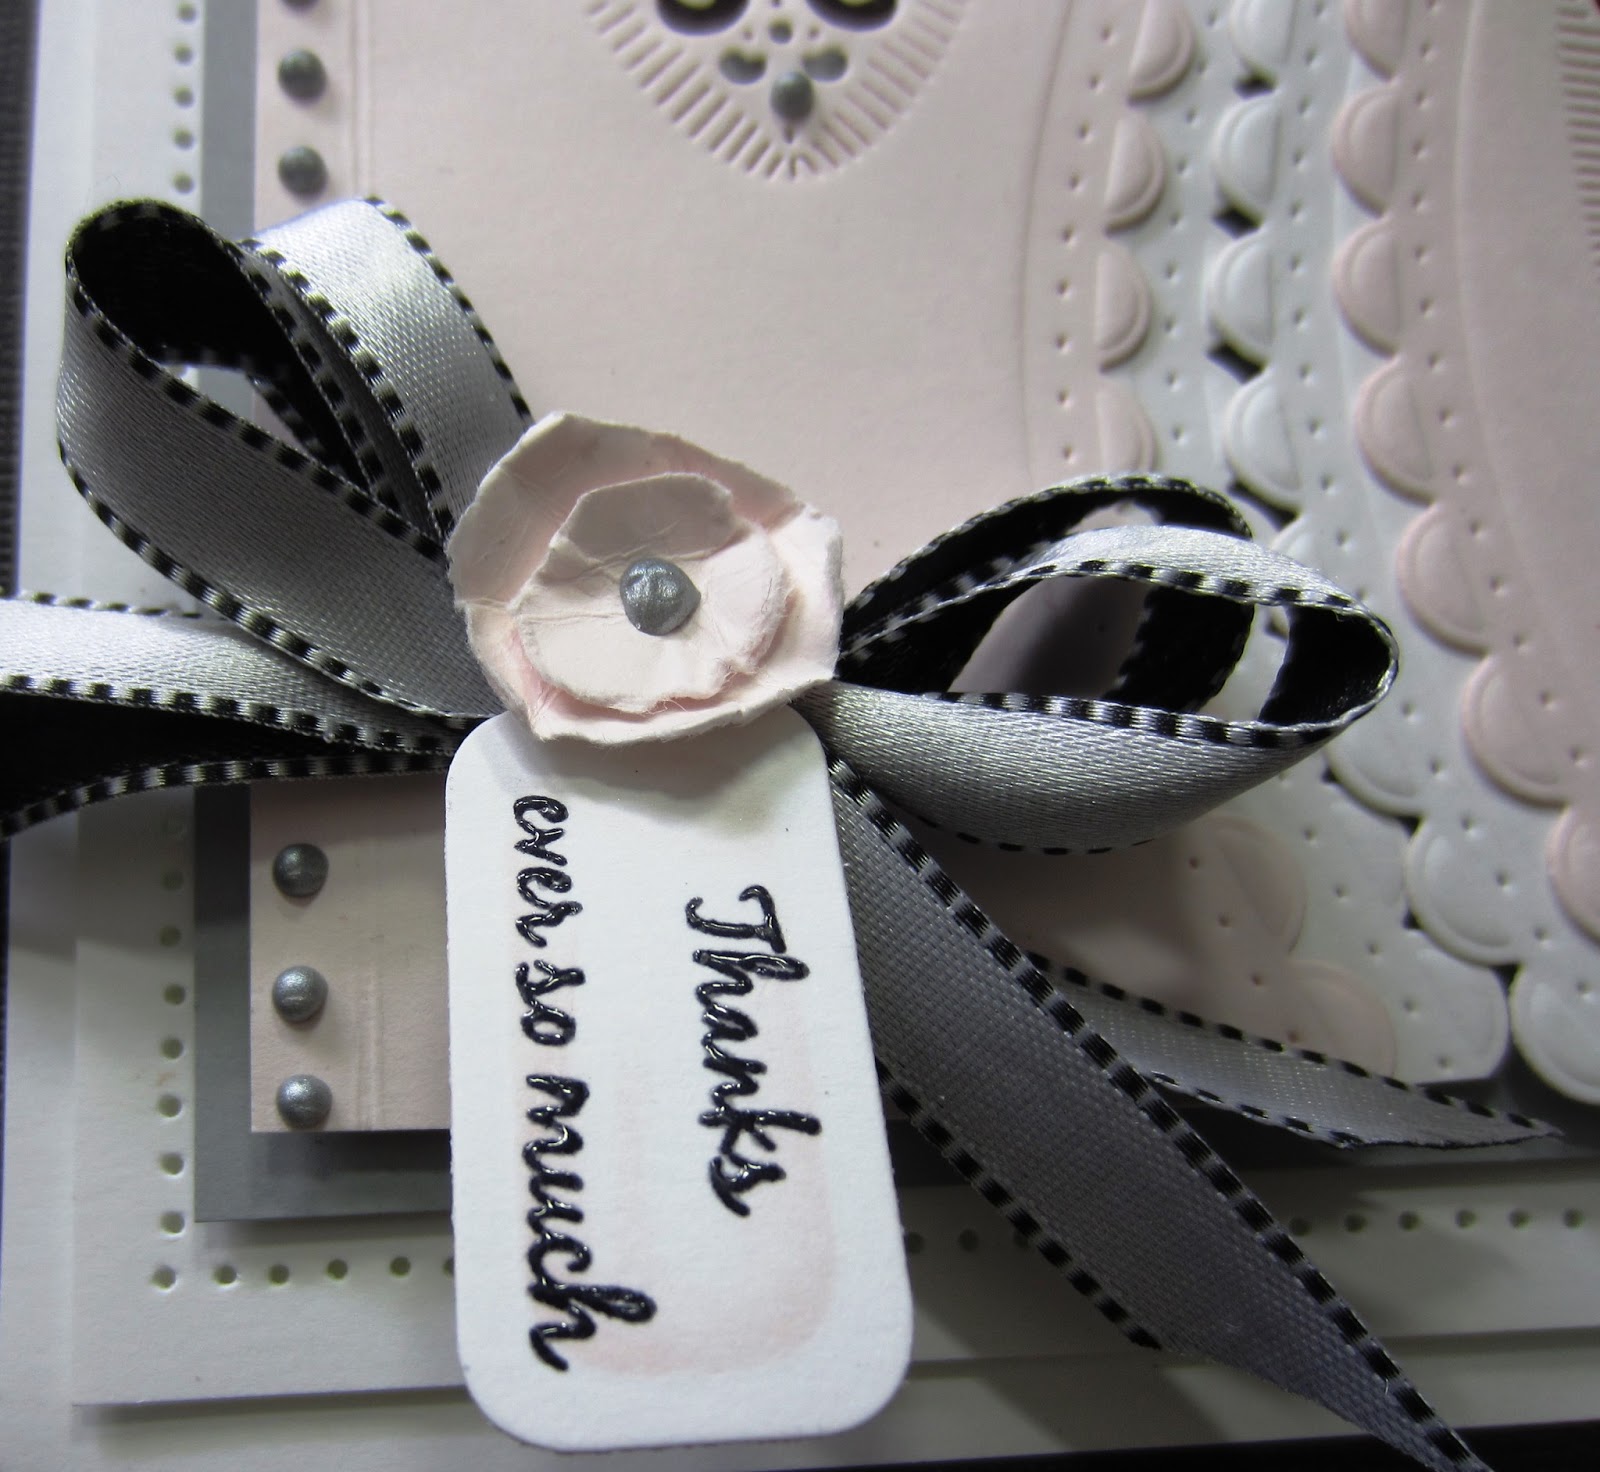
coconut white card.  I lined it up with the aperture opening and used the bracket border cutting edge on the bottom so it just peeked out from beneath the blue top piece.   I added mounting foam to the back of the blue piece to raise it for a dramatic effect.  I tied a piece of black silky crush ribbon around it and added a double bow to the side.  A pearl embellishment and 
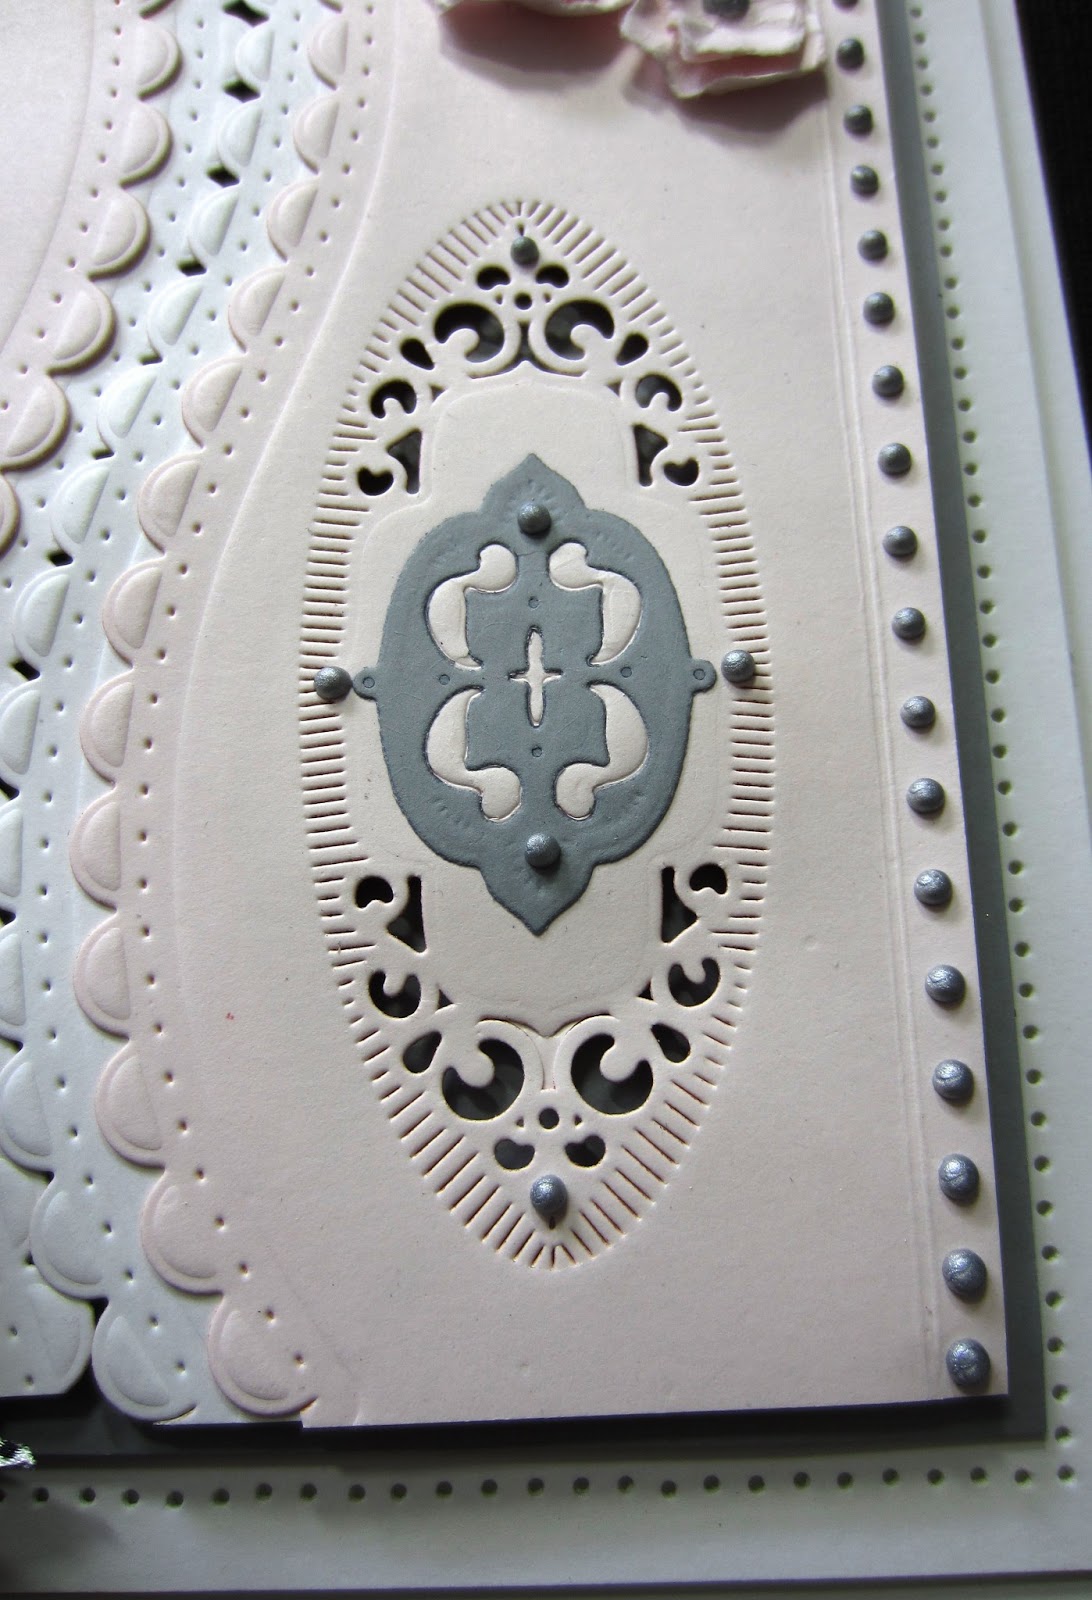
stick pins were added as accents.  I stamped my sentiment on coconut white card and cut it out with the oval from the Radiant Rectangle set.  I added in the next smaller die during the embossing phase to add a bit of pretty detail to it.  I inked the edge of it very lightly with Stormy Sky and mounted it on foam inside my aperture opening, adding some flat back pearls as accents to the sentiment and the corners of my background.  To complete the card, I added a black mat for balance before my final double white mats with the pierced inner mat. Hope you like it!   Finished dimensions are 7" x 8" in size.
Homossassa is known for it's manatees.  Even though January is the time of year that there are in greatest number here, I saw about a dozen of them in the bay as well as these that were at the wildlife park.  The water here was easier to photograph them.  These are about 6 feet in length, not too large by manatee standards!
While on the airboat ride, we also saw some playful dolphins!  They were swimming right near us but you had to be so quick to get a pic of them as they only surface briefly.  Looks a bit like a shark in my pic since all you see is the fin!


This next pic was actually taken when I was in Miami.  This was the cocktail that was being served at the table next to us at dinner.  I just could not believe my eyes when they brought it!  I'm not sure what keeps the two Corona beers from falling, but this thing was absolutely massive!  Pretty creative though!  The couple each had one and still hadn't emptied all the beer out of the bottles by drinking enough of the drink by the time we finished dinner!  He said it was called a "Bullfrog" (I haven't a clue why!).  The rim of the glass was about 6 inches across, massive I say!                                      
                                                                                                             And finally the card pics are below!                                  All for now, Sue x


Monday 27 May 2013

Curvy Thanks

Morning all!  Another sample showcasing the Curved Borders today.  I just love the different look that can be achieved with this die set, it is unlike any other.  I selected blush and mid grey and white for this card (I love pale pink and grey together!)  I cut the edges of two pieces of blush card using the Curved Borders scalloped piece.  I turned the dies in opposite direction so that they would meet and leave a pretty almost zippered look down the centre of my card.  I used the same dies and did this again to some white card and matted it below my pink pieces so it was just peeking out.  First however, on both of the blush card pieces, I used the decorative oval insert from the Radiant Rectangle set to cut a pretty decorative piece into the fatter portions of the pieces.  I used the small die from the Opulent Ovals to add a decorative grey piece atop them.  I added some Cosmic Shimmer silver PVA glue dots to them.  Using some leftover bits of card, I made some torn flowers for the upper corner and one extra to sit in the centre of my bow. These are very easy to do, just tear small circles and crumple them, then stack them using a glue dot.  Add small pearls or PVA glue dots to the centres as I have done here.  They are flat and easy to post too!  I tied the bow from reversible silver ribbon.  I stamped my sentiment and cut it out with one of the small tags from the Charmed I'm Sure set.  I inked it lightly with Spun Sugar distress ink and tucked the edge under my flower.  I added a few leaves from the Bitty Blossom set and inked them with Pumice Stone to keep my colour scheme.  Down both the sides, I added rows of silver PVA glue dots as accents and paper pierced the edges of my double white mat to finish the card. Definitely more of a girlie one today!  Finished dimensions are 6 1/2" x 7 1/4" in size.  All for now, Sue x


Sunday 26 May 2013

Thank You Wreath


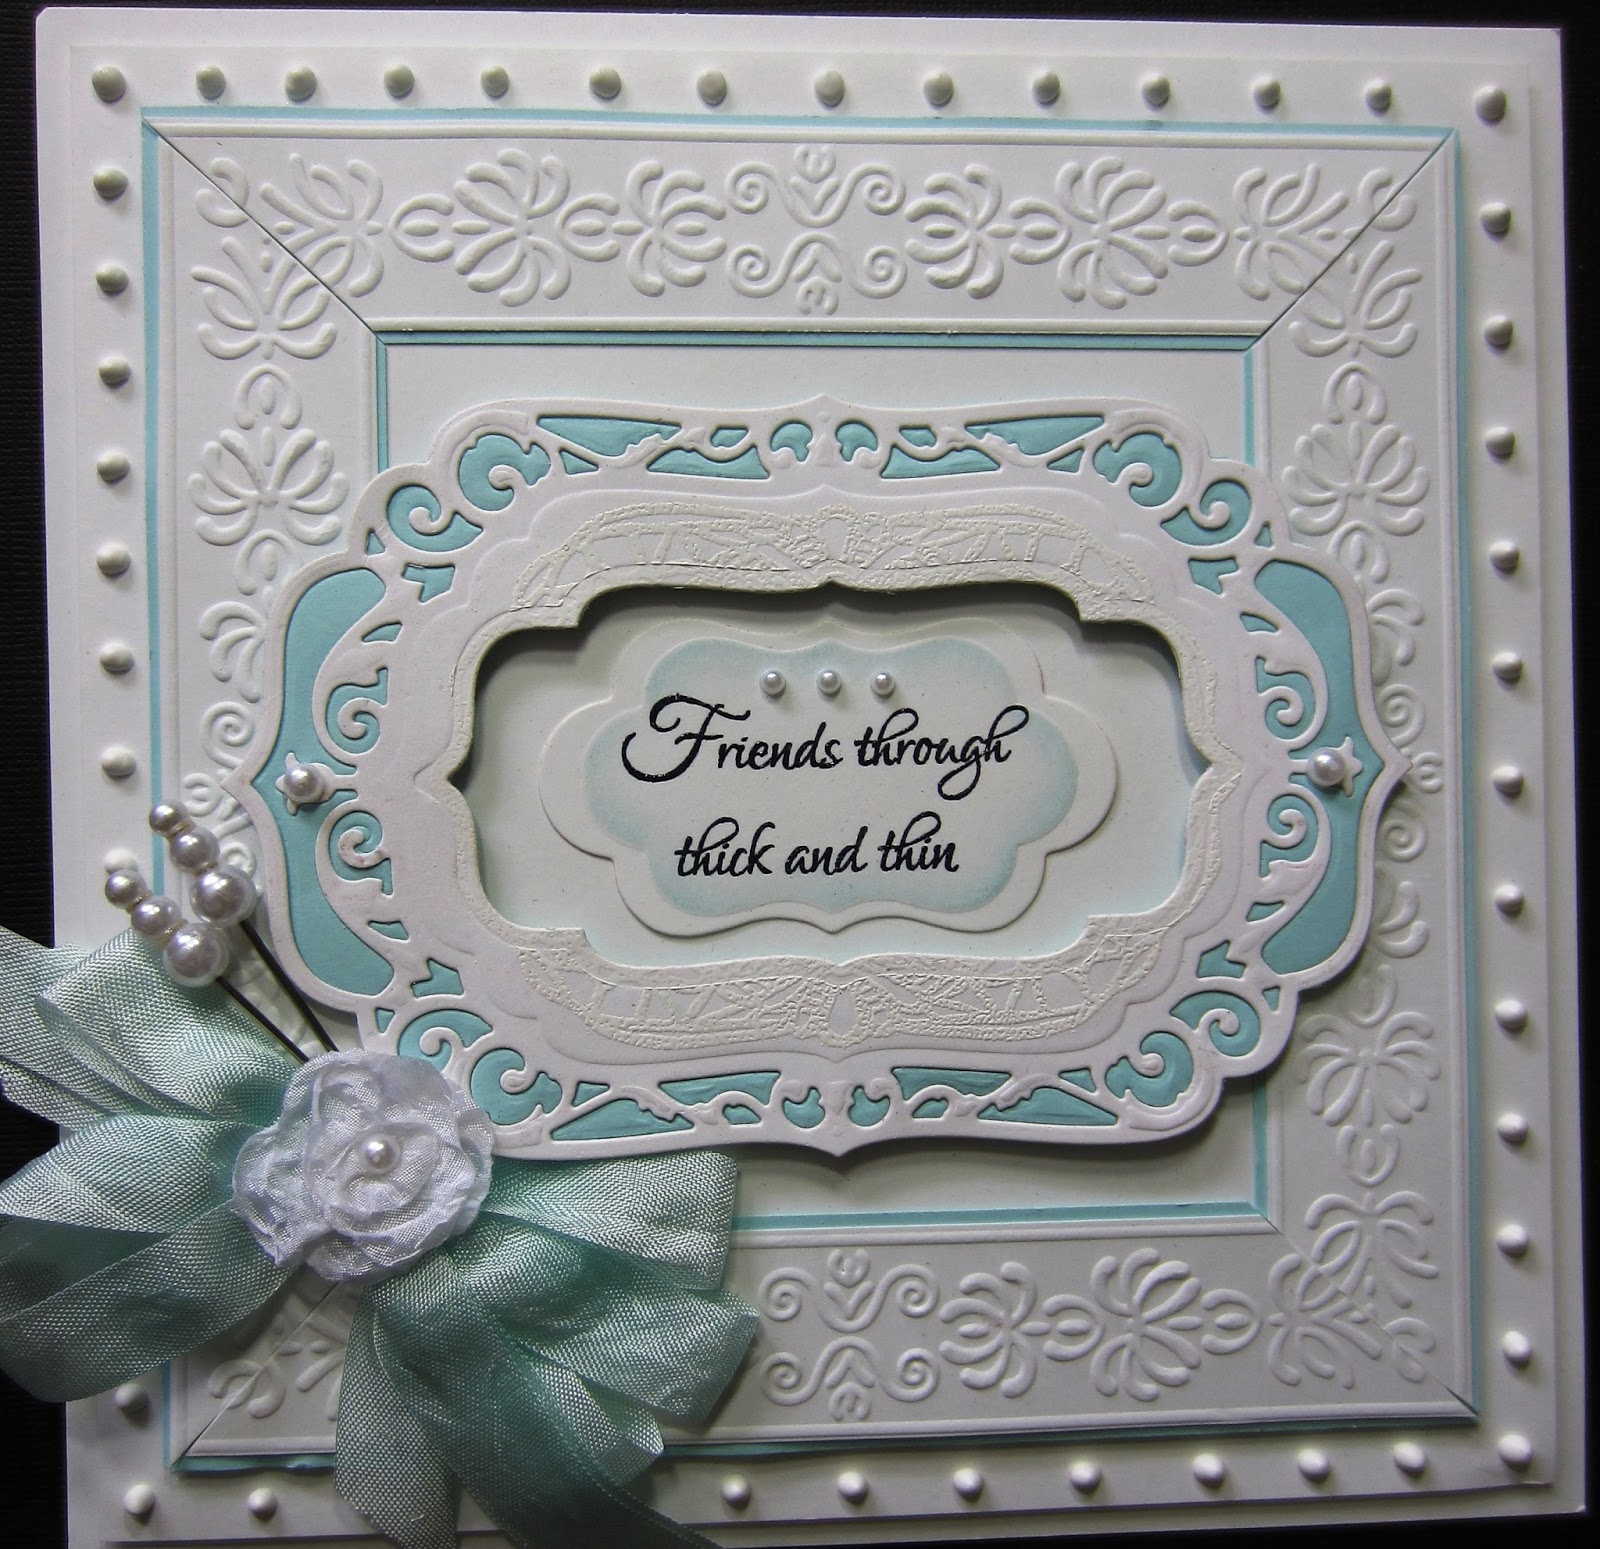
 Hi bloggers!  I know this one is a bit different from what you might expect from me, but I do try to think outside the box and use the dies in different ways.  I get so many emails asking what they can do with some of the smaller dies in the sets that I always try to include some samples made from them.  This one would probably be useful for those pesky male cards too by just changing the sentiment to suit your needs.  I started with a piece of milk coloured card and embossed it using my Interlocking Circles embossing folder to give my background some texture.  I selected two shades of green and began cutting multiples  of the corner from the Celtic Accents die set.  I ended up cutting and using nine of each colour.  Next I stamped my sentiment on milk card using a black archival ink pad.  It is difficult to see, but I stamped the Baroque Lace Stamp To Die For over the top using a Clear Perfect Medium pad for a watermark look.  I arranged my corner into  wreath shape and glued them in place using dries clear Cosmic Shimmer glue.  I cut around the sentiment piece so it didn't extend past the first loop of my Celtic corner wreath.  I mounted the wreath in the centre of my background using mounting foam for dimension.  I added another green mat before finishing the card with a double pierced milk coloured mat.  Truly a very easy card once all the cutting has been done!  Finished dimensions are 7" x 7" in size.

Now for the winners of the weekly Comment Game.  They are:
June Fletcher!!!
Floss!!!
Iggy!!!

Congratulations all!  Please email me at americansue1@gmail.com to confirm your address and claim your prize.  All for now, Sue x


Saturday 25 May 2013

Friends Make Every Day Special

Hi bloggers!  Don't they just!  As the sentiments says!  I had this craving to use red in some way that I normally don't so I decided to pare it with tan and white and I really like the way they balance each other!  I started by embossing my coconut white card using the Whimsical Flora embossibility folder.  I extended the pattern even though t doesn't line up exactly, but it is quite busy so it doesn't show the join area very much.  I matted it on red for balance.  Next I started on my focal element using the Radiant Rectangle die set.  I cut the largest piece out of red card as a base.  I cut the next piece out of tan card and used the two largest dies in the set to get the decorative edge.  I matted this onto my red piece so it showed through and glued them together.  I cut the next layer in red using the smaller rectangle and the next die down in the set.  This gave me a red frame.  I used the decorative oval in the set to cut a tan piece which I sandwiched back into the red frame as it was the same die that I used to create the inner shape on the frame.  I cut a bottom mat piece out of white card and glued all the pieces to it so that the white could be seen through the decorative edges.  I stamped my sentiment and cut it out with the oval and the next die down in the set.  I cut an oval out of red card and used it to mat behind the sentiment piece.  I mounted this with foam in the centre of my larger die cut pieces to complete my focal element.  I added a messy bow tied out of lipstick red seam binding and some natural jute.  I finished my bow with stick pins and a red Dazzler.  Flatback pearls were added to the corners of the die cuts and the card for embellishments.  A double mat of coconut white card was added to finish the card with a pierced inner mat.  Finished dimensions are 6 1/2" x 8 1//2" in size.


Friday 24 May 2013

Just A Note

 Morning guys!  I have a soft, simple really girlie card for today.  Blush and white are the colours in case your monitors aren't picking up the colours as they are very pale.  I started by embossing my blush card with my Interlocking Circles embossing folder.  I added a centre section of embossed coconut white card using my Heart Lattice embossing folder as I love the way these two folders look together.  I matted my white embossed piece with a blush and white mat to help it stand out a bit more.  Before attaching it to my background, I wrapped two pieces of Flesh seam binding around it from top to bottom in a "V" sort of shape.  I stamped my sentiment in black and used the smaller of the dies in the Stately Circle set to emboss the design around it.  I used the next larger die to actually cut it out and give me a pretty scalloped edge.  I cut one more this size out of blush card and offset it behind my sentiment.  I mounted these together then mounted them on foam near the bottom of the card.  I tied a messy bow with the flesh seam binding and added it below my sentiment.  Using the smallest size in the Stately Circle die set, I cut three of them to create a small flower to sit in the middle of my bow.  I added a small flat back pearl to the centre and very lightly edged it with Spun Sugar distress ink.  I added 5mm white flat back pearls to all the intersecting points on the interlocking circles as embellishments.   Then  added my usual double mat and pierced the inner layer of the coconut white card I picked to finish the card.  The finished dimensions are 7" x 8 1/2" in size.  All for now, Sue x